Celebrity Tote Bags!

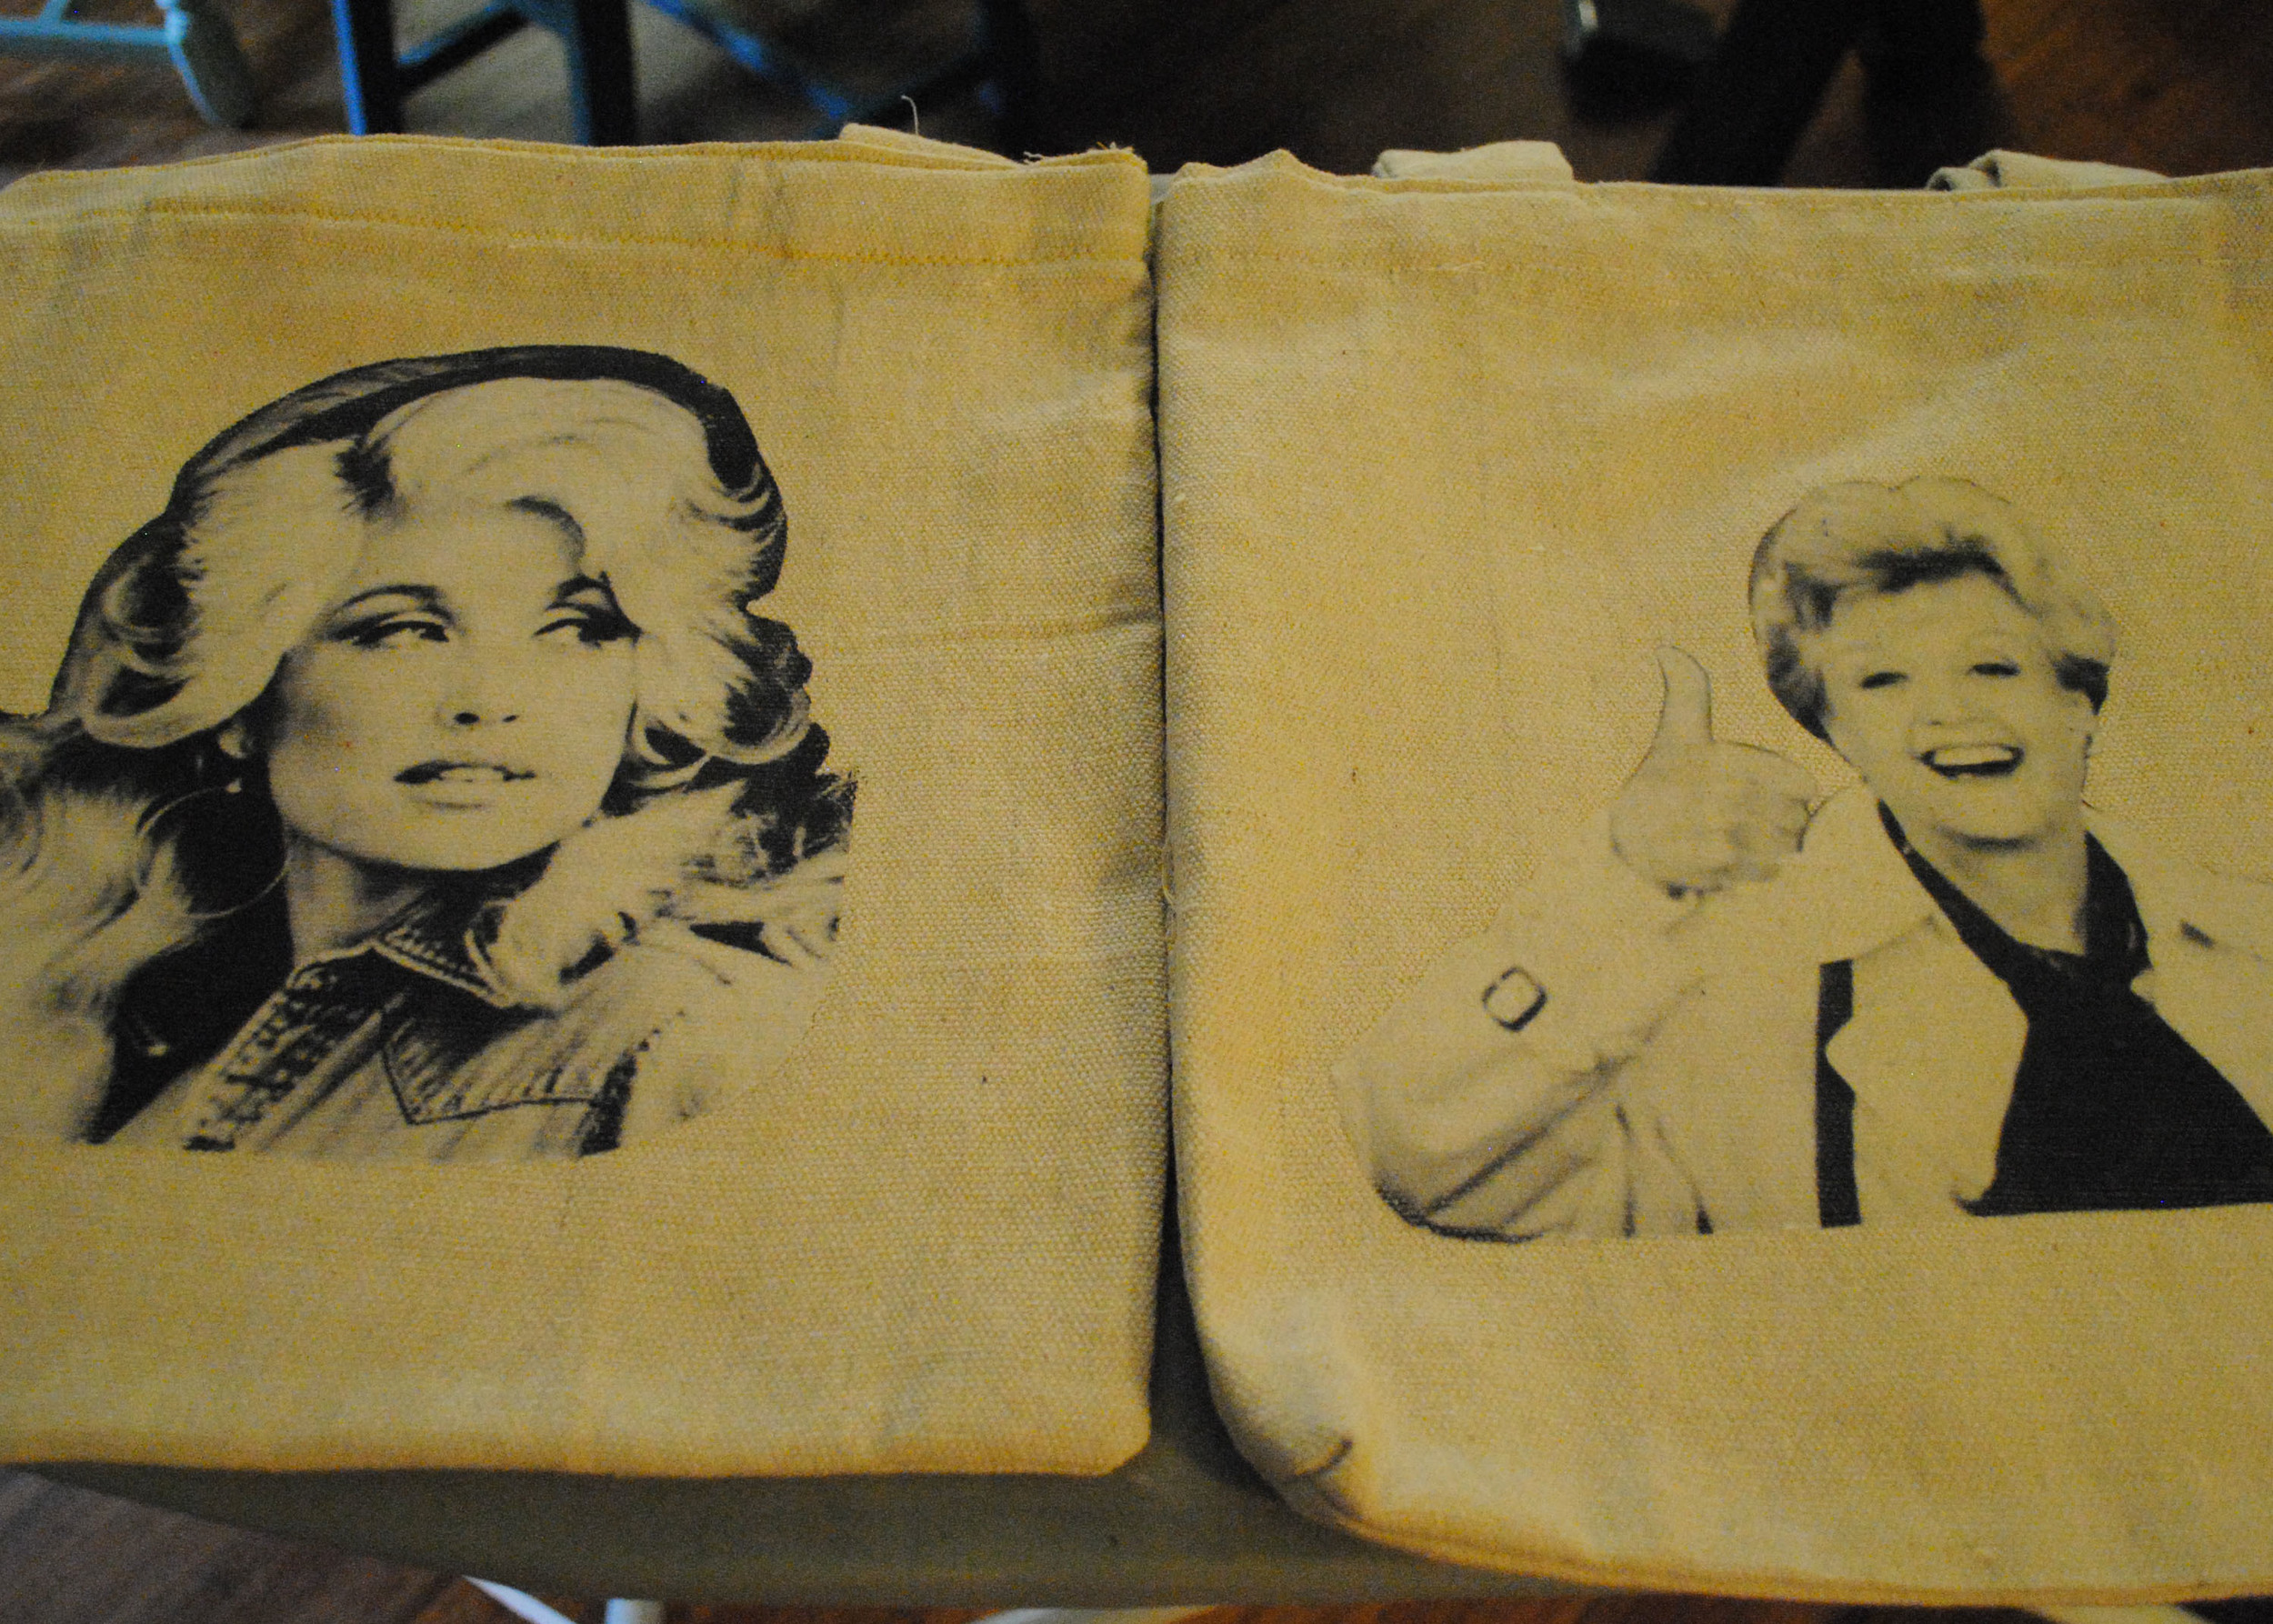
A few weeks ago, A Beautiful Mess put up a simple tutorial for putting images onto a tote bag using iron-on transfer paper. Elsie used a pre-made bag and created a polka dot-style display of young Dolly Parton. The result is adorable a little kitschy in the best possible way. 

The idea got me thinking, especially because my friend Lauren is a Dolly Parton lover and recently got a sewing machine that she's not quite sure how to use. What a perfect opportunity to get to know her machine while making something delightfully adorable. 

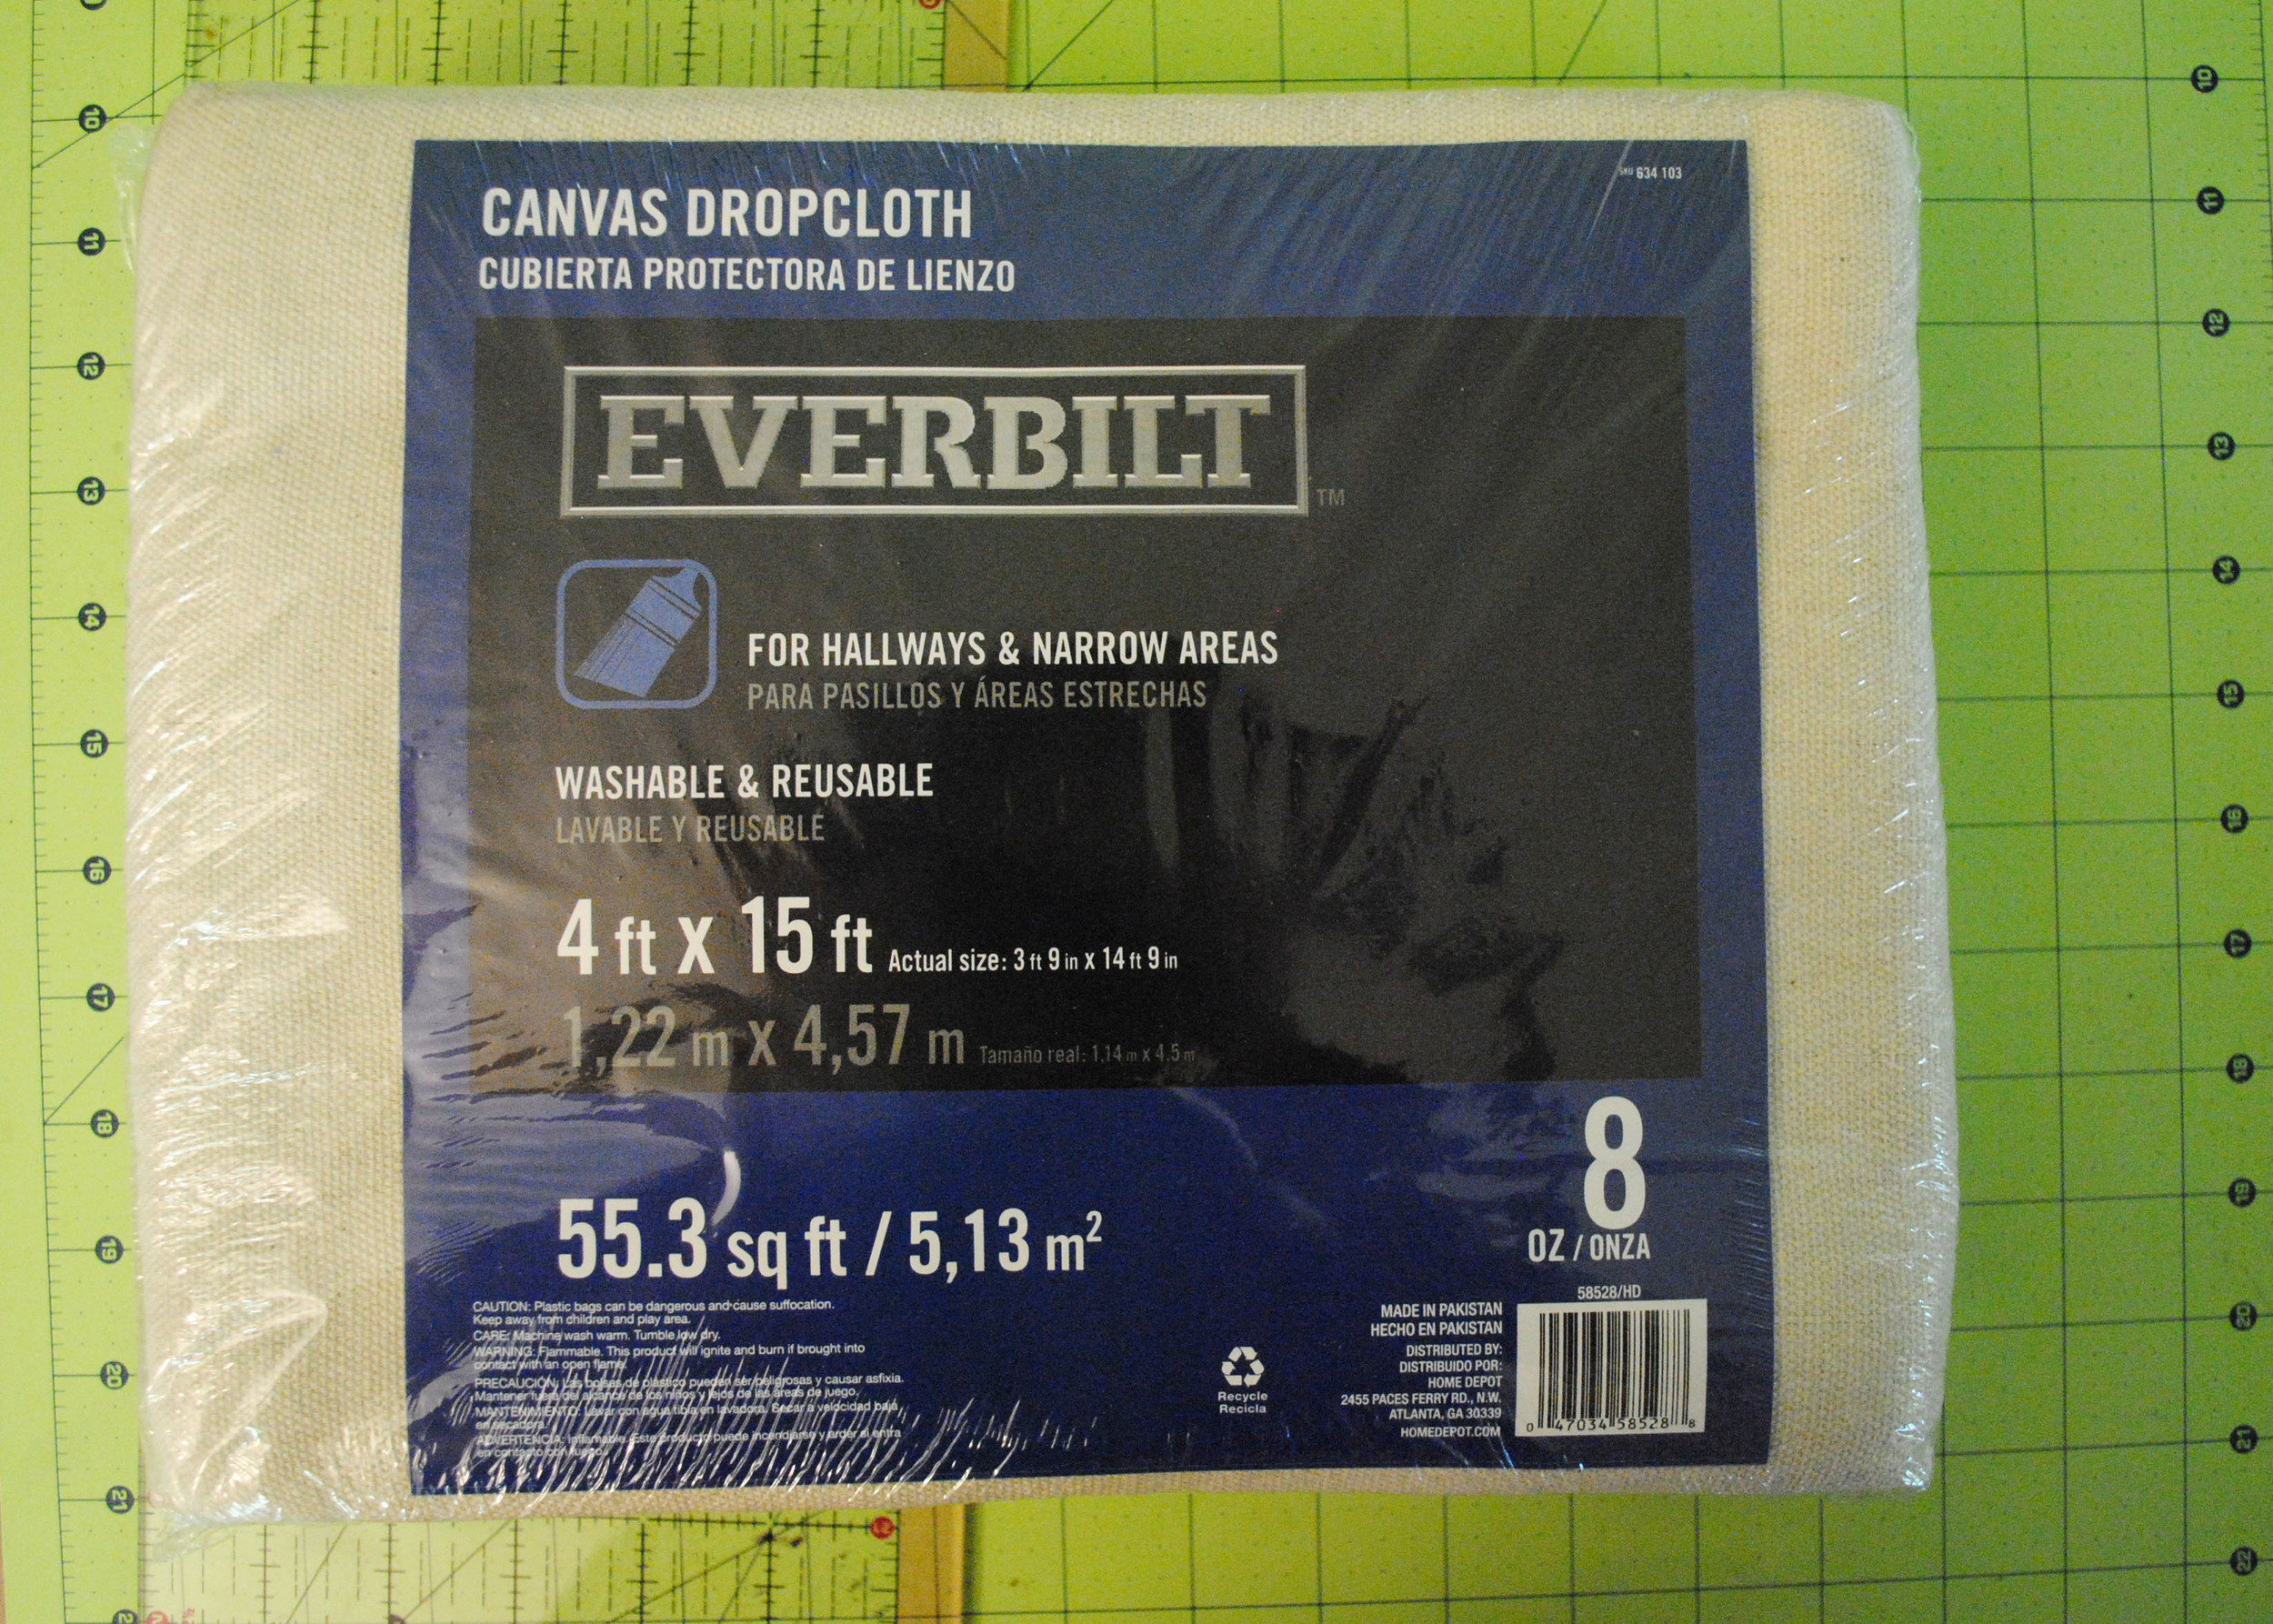
Last weekend, Lauren and her machine joined me for a few hours of cutting and stitching and ironing and chatting. Because I wanted to help her with the sewing portion as well, we made simple tote bags first, using this tutorial from The Purl Bee. It's great for a beginner, and we made ours even easier by using very forgiving cotton canvas from a large drop cloth. Drop cloths from your local hardware store are an excellent way to get a huge bunch of fabric for cheap - this one cost me $17, and I could probably make 15 more tote bags out of it. 

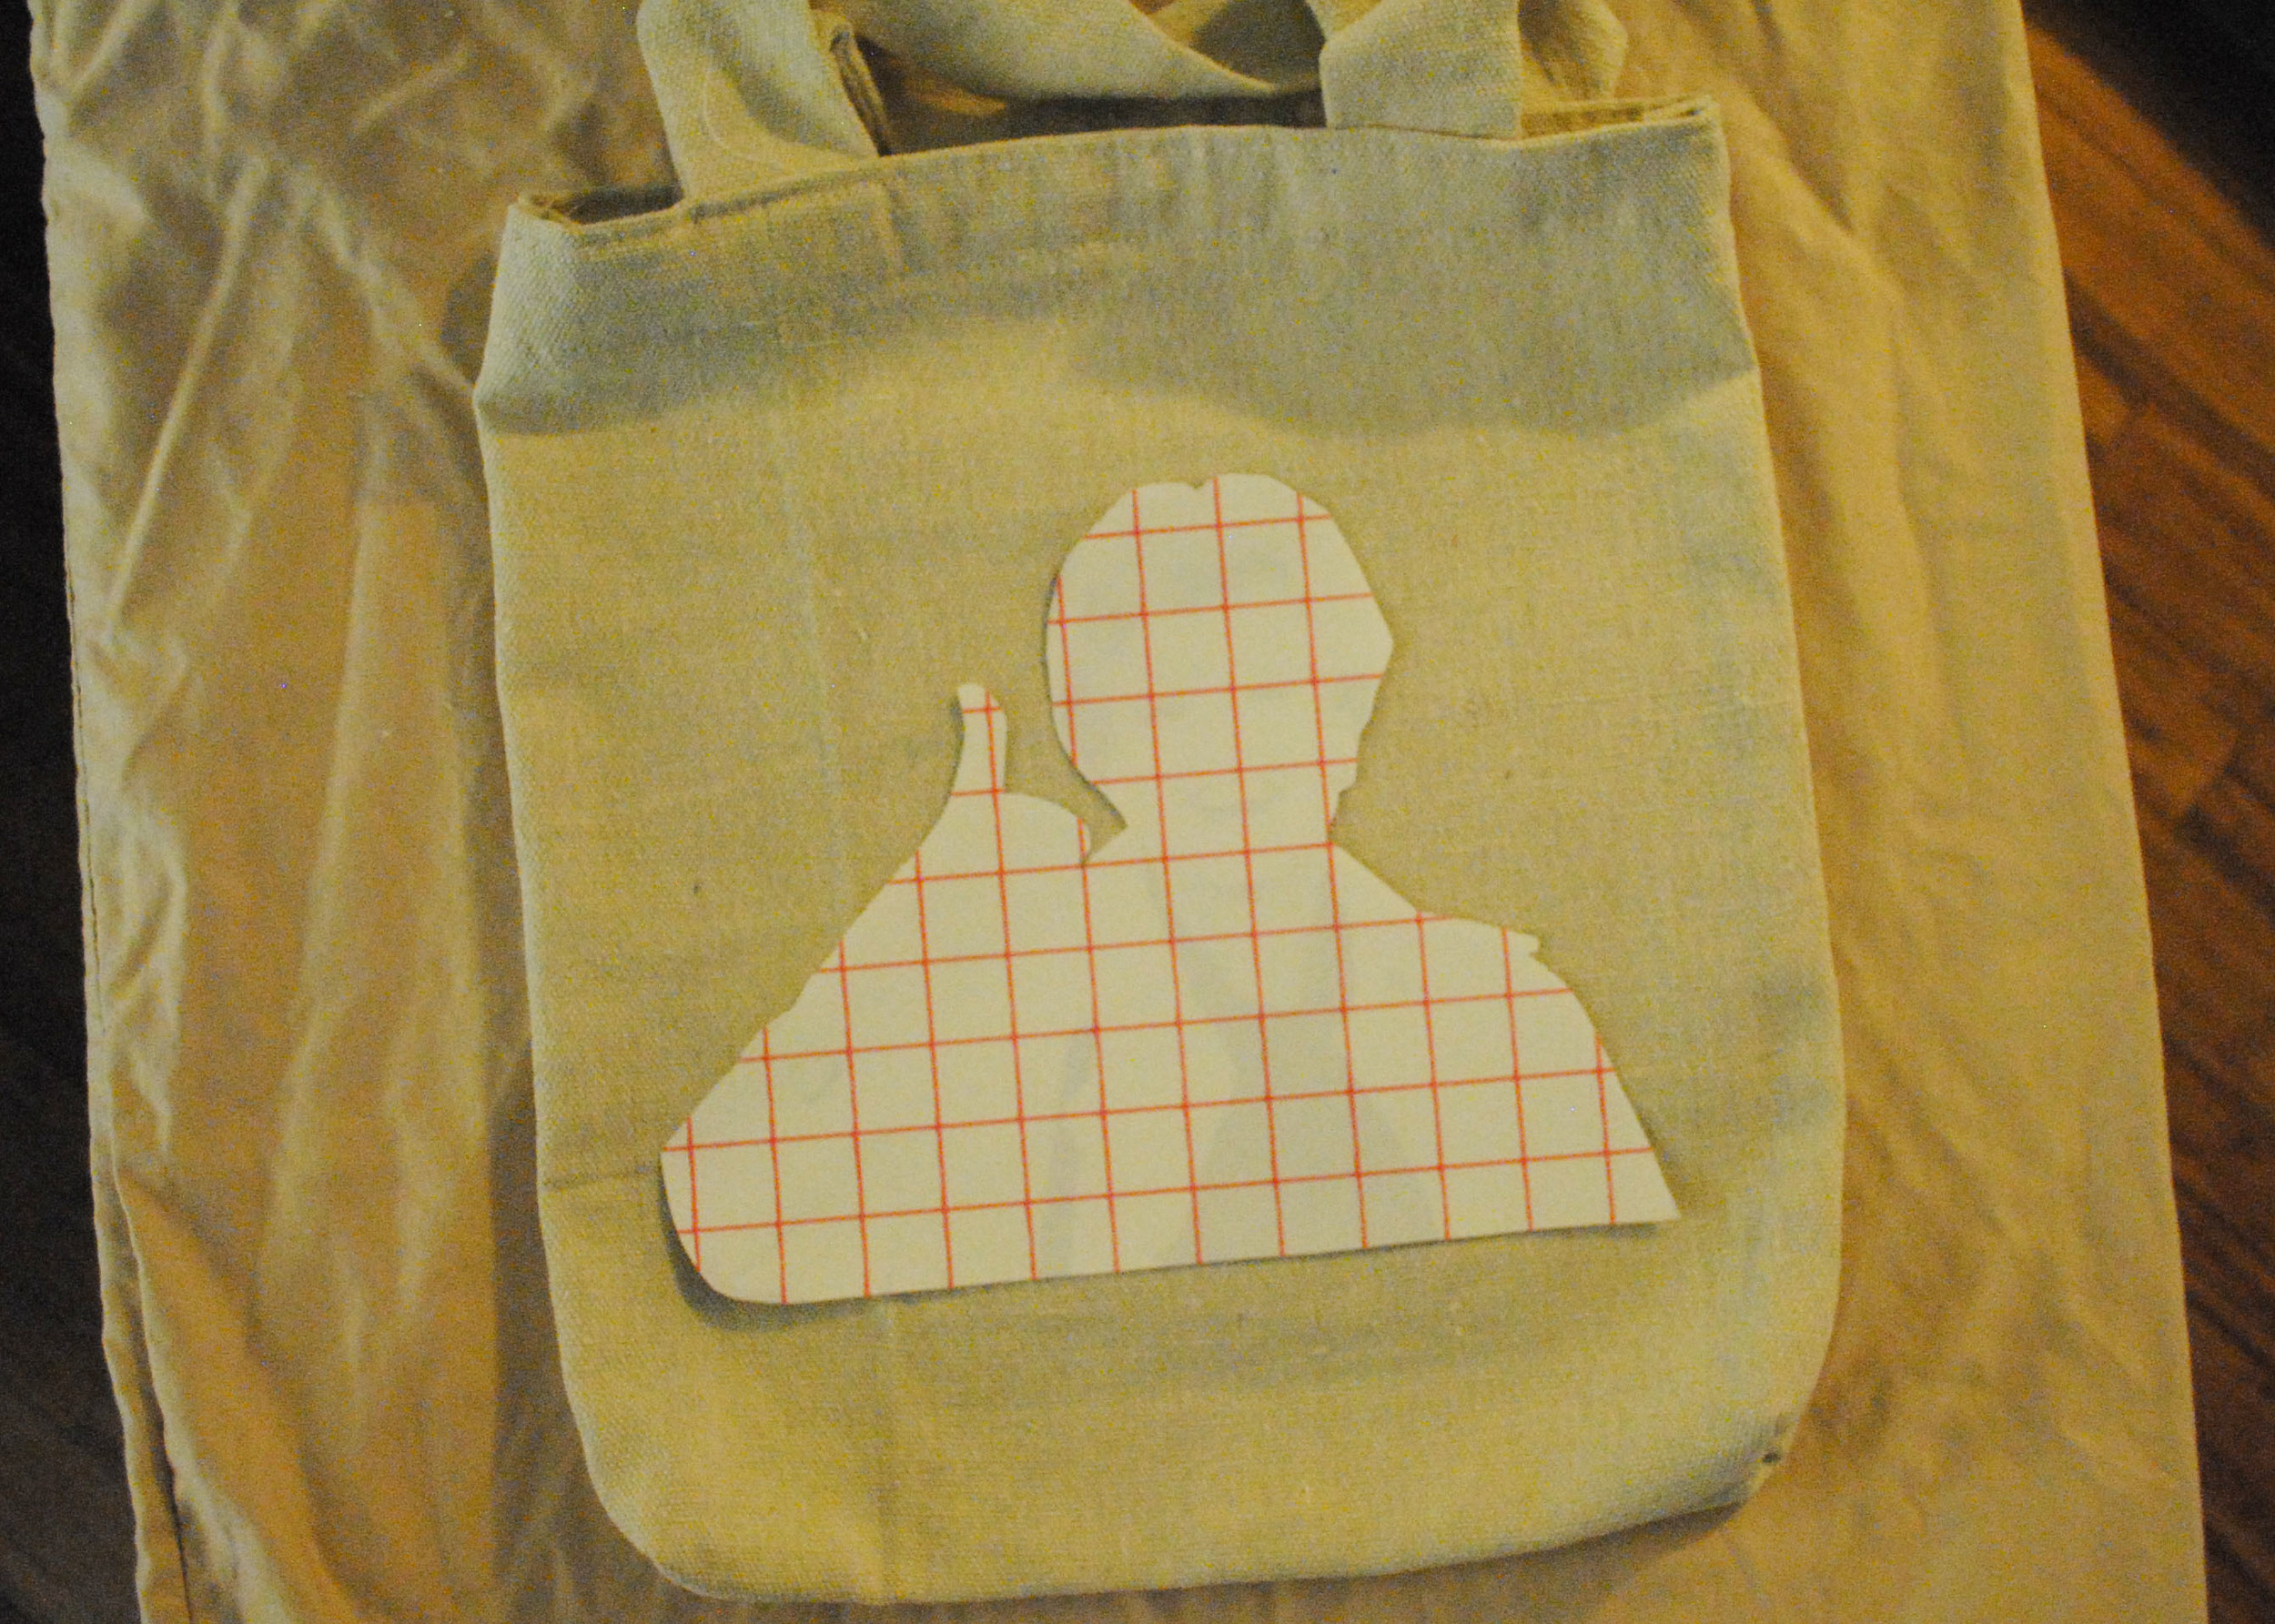
After the bags were finished, we printed out our images - hers, Dolly Parton, and mine, Jessica Fletcher from Murder She Wrote (obviously). Once I found images I liked on Google Images, I converted them to black and white in photoshop and then adjusted the lighting (increasing the contrast and the brightness) to create a simpler look that dips just a bit into the pop art realm. We were going to do single large transfers rather than the polka dot style Elsie used, so I reversed the images (since an iron-on creates a mirror effect) and printed them onto iron-on transfer paper using my color printer. 

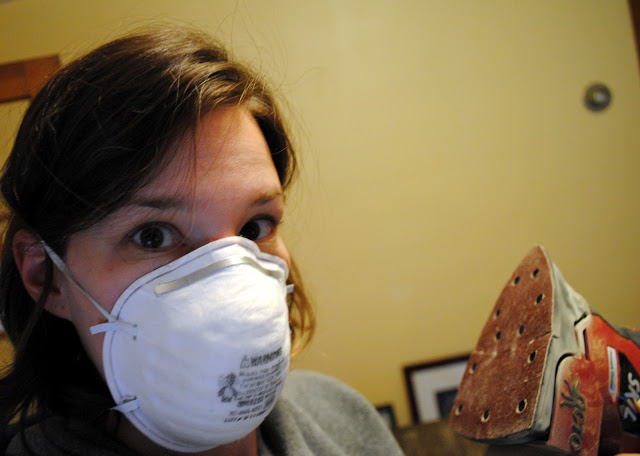
Here's where we really got some good chatting in - it took forever! The instructions on the transfer paper said to press very firmly with the iron on a hard surface (not an ironing board) for 2 1/2 minutes, let the paper cool completely and then peel the backing off. 

We each ironed for at least 15 minutes before we were able to peel off the backing. For a short while, I was concerned the whole thing was going to be a crafting disaster. The key seemed to be the really hard surface (we switched from a table to an ironing board to my kitchen counter) and a little extra time because we were using a bumpy canvas material that had more difficulty accepting the transfer. 

Ultimately, we prevailed, and Jessica's thumbs up makes me irrationally happy every time I see it. 

So I'm curious. Who would you put on your bag? 

p.s. Easiest Fabric Napkins


Like what you just read? Share it with a friend! You can also follow ktmade on TwitterFacebook, or Instagram so you'll never miss a post. And you'll earn my undying affection!

You're Just Not That Good At It


I'm awful at sports. I have been for as long as I can remember. The thought of a "friendly" game of anything - softball, kickball, frisbee - can send me into a middle school angst I don't enjoy reliving. In my younger years, that was hard. I felt deficient.

But now it's just a part of me - something I can laugh about and honor. I love cheering people on from the sidelines. I'm excellent at shouting, "Woo-hoo! Keep it up guys!!"

I've accepted that rowdy games of touch football are not in my future. But there are these other things - things that I'm supposed to be good at, that the Me that I imagine myself to be is good at.

But, the thing is, I'm not actually good at them.

My wife gives me this particular look every time I come home with a plan for a home improvement project. Her eyes plead with me, Are you sure you want to do this? And my response every time is one of two things: dismissal or anger.

No matter how many times I have sat cursing or crying on the floor surrounded by a pile of screws and power tools, I refuse to believe that when it comes to carpentry projects, I'm just not that good at it. My picture of myself is as someone who is crafty and resourceful, who grew up with crafty and resourceful parents, who learned a little something from them, and who can drive a flipping screw into the wall without stripping it.

And yet.

Every time. Every. single. time. I strip a screw (or twelve). The anchors won't go in. I misjudge where the stud is (even though I'm using a stud finder). The shelf is crooked. The curtain rod is wiggly on one side. I ruin the board. The project that was supposed to take fifteen minutes is still unfinished two days later because I had to walk away after an hour and a half of struggling so I didn't throw my drill across the room.

The problem is not that all of these things happen. It's that every time, I refuse to accept that they're going to happen. Each time I pick up a screw or a hammer, I think this is the time that my natural handy abilities are going to kick in. This is the time that the fifteen minute project is going to take fifteen minutes. And each time, I battle against the realization that my perception of myself is flawed - at least in this regard.

So while it's frustrating to strip a screw or ruin a piece of wood, the real temper tantrum is about something more - it's about who I think I am and who I am repeatedly forced to realize I am not.

I'm not saying that I can't do carpentry projects, that I can't learn how to hang my own shelves and put up curtains. But I am saying that I am finally beginning to realize that I do have to ask for help. I do have to expect that the project will take me ten times longer than it's "supposed" to. I do have to plan to mess up.

Because while I want to be someone who is self-sufficient and can just pick up a hammer or a screwdriver and take care of anything in my house, I'm not that person. At least not yet.

I'm just not that good at it.

But I'm also beginning to realize that's okay. Because once you accept that you're just not that good at it, that's when you can be honest about how to get good at it. That's when you can stop battling and start learning.

So, help me out here and fess up. Are there things you think you're supposed to be good at, but you're just not?


p.s. I have completed one awesome carpentry project!

(In an operatic tone) Taaaaaa DAAAAAAA


It's finished. 


After many, many hours - I estimate somewhere around 20, maybe 30, spread out over three months - the table is complete. 


And I'm quite happy with the result. 


There were a lot of snags along the way, and it took me much longer than I anticipated.   Even now, it's not perfect.  There are some weird marks from the staining - I think because the wood conditioner might not have been completely dry in some places.  And the polyurethane job is far from flawless. 


But, as Navah keeps reminding me, it was my first piece.  They'll get better in the future. 


Here's what I learned about refinishing furniture:


1.  Never refinish furniture in your dining room (probably not in other rooms either). It's annoying and smelly, and even if you put a drop-cloth down, sawdust and stain and polyurethane will inevitably get in places you don't want them.  


2.  It always takes longer than you think.  However long you think it will take, triple it. 


3.  Check what grit sandpaper your power sander will accept before you buy it.  And your best bet is to buy a sander that accepts a universal size sandpaper.


4.  Sand by hand before you stain


5.  If you're using wood conditioner, let it dry for at least 45 minutes before you start staining.


6.  Make sure your brush is absolutely 100% clean before you apply your second (or third) coat of polyurethane. 


7.  Don't expect perfection - unless, of course, you know what you're doing. 


Thanks for all your suggestions and support along the way!


Now it's time to find some chairs. 


Katie 

Happy 4th of July! I hope you're all reading this on your phones or something while you eat barbeque!

Table Staining Fail


It was a sanding fail actually. It's just that I didn't know about it until I was staining. 


Here's what happened. 


On Friday I woke up completely jazzed to finish my table. With the sanding done, I coated the whole table in a wood conditioner, which helps to avoid any splotchiness with staining soft woods like pine. 


It only takes about 15 minutes to dry, and I got started with the staining. I was very nervous about the color. In fact, I had bought one color - Early American Minwax - and returned it before I even opened it for Special Walnut Minwax after I did a little more online research (via google images).


So the good news was that after 4 coats of the stain - spreading it on with a foam brush and then wiping it off almost immediately with a rag - I was getting the color that I'd been hoping for. 


The bad news was that I was seeing sanding marks from the power sander all over the top of the table. 


I walked away from it for a few hours so that I could go back with fresh eyes. I really, really did not want to sand that thing down again. But when I walked back, they were still there, as noticeable as ever. I just couldn't stomach the idea of sitting down at that table for the next 10 years and seeing lots of sanding marks that I knew didn't have to be there. 


So I decided to sand the whole top down again and use a finer grit sandpaper to finish it. I'm leaving the legs as they are because who's going to climb up under the table and look for sanding marks? Also, I value my sanity.


The problem I then faced was that my sander does not accept sandpaper any finer than 120 grit. So that was the finest I had used, and it clearly wasn't fine enough. I had been dissatisfied with the sander in a lot of ways, including its poor dust-sucking ability and its incredible loudness. So I headed off to Lowe's (after posting on a neighborhood forum to see if I could borrow someone else's and having no luck) to buy a random orbital palm sander.


I went a bit more expensive than my original sander out of necessity. They didn't have any cheaper orbital sanders.


But so far I'm very happy with the results - much smoother finish even with 80 grit, and the machine itself is way quieter. 


The plan now is to finish sanding tonight and stain it tonight or tomorrow night. 


As I'm sure you can imagine, I am itching to get this project completed so we can have our dining room back. 


So wish me luck!
Again!

Katie 

Ding Dong the Sanding's Done

The Sanding's Done!
The Sanding's Done!
Ding Dong the Endless Sanding's Do-o-o-ne!


Please excuse my silliness. 


I thought I was going to be sanding that table for the rest of my life. I thought my dining room would forever be covered in a fine film of sawdust. I thought my ears would never stop ringing.


But it's done. Finished. 


The legs were really the tough part. There are no spindles or anything, but even so, getting into all those little crevices was no easy task. For some parts, I had to whip out the regular old sand paper because my sander wouldn't fit, even with all its fancy attachments. 


And the legs were in pretty bad shape, so there was a lot of sanding that needed to be done. Even at the end of all of it, they still don't look good as new. There are some places at the bottoms of the legs that I've mentioned before where I'm not sure what happened, but there are lots of dark spots that just won't sand down. It's like they're soaked all the way through the wood. 


I used wood putty to address the places where there were real divets or holes, but there wasn't really anything to be done about the spots. And I some point I just had to accept that it wasn't going to be perfect and remind myself that the look I've been going for since the beginning was a rugged farmhouse table, so some imperfections should just add to its authenticity. Right?


After the wood putty dried, I switched from the 80 grit sandpaper I'd been using (after the 60 grit) and did the final rounds over the entire table with 120 grit to get rid of any of the sanding lines and get the whole thing to a uniform smoothness. 


Remember the words that were carved into it when I started?


I didn't get it out completely, but once this is stained, I don't think it'll be that noticeable at all.


So after about 5 hours of sanding over the weekend, this baby's ready for some color. 


The plan is to start the staining this evening after work. I don't think it will take that long, but then, I've been wrong about this table before. 


I'm so close to this table refinishing project being complete, and I just can't wait to have a gorgeous new table!


Wish me luck!


Katie


For a look back on the table project from the beginning:


Part 1 - On the Docket
Part 2 - Going Blonde
Part 3 - What's Happening with the Table?

What's Happening With the Table?

Some folks have been asking what the story is with my table refinishing project. I told you it was on the docket for April, gave you a teaser shot of the blonde wood, and then...crickets.

I made a lot of progress, but then the little chicks came to stay with us for a week, and I couldn't sand lest their little lungs fill up with sawdust! And then we were out of town for a couple of weekends and had family come to visit. And then I started my job.

I threw a tablecloth over the table and took a bit of a break.


I suppose it's time to get back to this behemoth. Of course, when I look at the legs, it's hard to get my motivation up. That sucker's going to take a lot of sanding.

Seriously, what happened to this thing?

I don't know, but when I convinced my lady that we should buy an enormous $40 dining room table in horrible condition, it was accompanied by a promise that I'd turn it into something beautiful.

So what's left to do?

1. Finish the first level of sanding on the legs (3 hours)
2. Do two more levels of sanding with increasingly finer grit on the table top (2 hours)
3. Maybe do one more level of sanding with a finer grit on the legs (2 hous)
4. Wipe everything down with mineral spirits (15 minutes)
5. Choose a stain (1 hour)
6. Stain the whole table (2 hours)
7. Sand and apply polyurethane (3 hours)

Wow. If my estimates are correct, I still have another 13 hours or so of work on this sucker. Yeepers.

I guess I better get moving on it if I ever want to have that beautiful table.

Wish me luck!
Katie

Going Blonde

No, I'm not bleaching my hair. (Though the "natural highlights" I've been rapidly acquiring as I age do seem to be pointing me into the blonde arena.)


This one's all about the table. 


Remember this guy?


After giving you guys the run-down of what was on my crafty to-do list, I couldn't wait another second to get started on the table. And folks, it's a job. I'm thoroughly enjoying it, but it's not for the faint-hearted. 


I started off with my new Skil power sander and 60 grit sand paper (all purchased with the help of an incredibly nice salesman at Lowe's).


After a few runs over the table, I realized that the sandpaper was taking off the stain very quickly in a few spots with very little change in other spots. 


The culprit? The varnish. In some spots, it had been worn away from weather or damage, and I was already down to the bare wood. But in other spots, where the varnish was still there, the sanding was taking forever. 


I was a little concerned about the possibility of uneven sanding leaving me with divets or dips in the surface of the table. So I headed back out to Lowe's to get some chemical stripper. I had decided against chemical stripper initially for two reasons. First, I had to refinish the table inside, and I didn't want to suffocate from the fumes. And second, most of the stripping I'd read about was stripping paint, not stain. I knew that even if I used a stripper, I would still have to sand since stain gets deeper into the wood. So I figured, why do both?


But once I saw the little unevenness problem, I thought a stripper was probably necessary or at least a big time-saver. I went with the most eco-friendly one I could find, knowing that it likely wouldn't do as good a job as the ones that would stink me out of the house. I settled on Citristrip's Paint and Varnish Stripping Gel. 


After slathering it on according to the directions and tapping my toes for the requisite time period for it to do its thing, I scraped it all off.


Notice the area here where the sanding had already gotten down to the wood as compared to the rest of the surface, where the stripper is eating at the varnish.
Boy, what a satisfying feeling!


No more shine from the varnish!
Getting rid of all the varnish took time and some muscle. Working on the legs was the hardest part. I did two rounds of it and went over everything with a steel wire brush and some mineral spirits to get any residue off. 


Stripping removed all of the varnish, and then it was time for me to do some more sanding to get down through the stain to the bare wood. Because the stripper had already done much of the work for me, the sanding went much more quickly the second time around, leaving me with lovely blonde wood - probably pine. I was able to sand down the top of the table in a couple of hours.


Of course, there's a lot of work still to go. I've begun on the legs, but they're trickier. 


Thank goodness my Skil power sander has lots of attachments for hard-to-reach places. (Have I mentioned how delighted I am to own a power tool?)


And I'm only part way through the sanding - I'll still have to go over everything with the finer grit sandpaper. Even so, some of those trouble spots are looking better already.


Remember this lovely carving?


Well, look at it now. 


I think after another round or two of sanding with increasingly finer grit, that sucker'll be smooth. 


Once the whole thing is sanded down, it'll be time to do the really exciting part - picking a stain color! But I'm getting ahead of myself. 


There's sanding to be done. 


Katie