Celebrity Tote Bags!

A few weeks ago, A Beautiful Mess put up a simple tutorial for putting images onto a tote bag using iron-on transfer paper. Elsie used a pre-made bag and created a polka dot-style display of young Dolly Parton. The result is adorable a little kitschy in the best possible way. 

The idea got me thinking, especially because my friend Lauren is a Dolly Parton lover and recently got a sewing machine that she's not quite sure how to use. What a perfect opportunity to get to know her machine while making something delightfully adorable. 

Last weekend, Lauren and her machine joined me for a few hours of cutting and stitching and ironing and chatting. Because I wanted to help her with the sewing portion as well, we made simple tote bags first, using this tutorial from The Purl Bee. It's great for a beginner, and we made ours even easier by using very forgiving cotton canvas from a large drop cloth. Drop cloths from your local hardware store are an excellent way to get a huge bunch of fabric for cheap - this one cost me $17, and I could probably make 15 more tote bags out of it. 

After the bags were finished, we printed out our images - hers, Dolly Parton, and mine, Jessica Fletcher from Murder She Wrote (obviously). Once I found images I liked on Google Images, I converted them to black and white in photoshop and then adjusted the lighting (increasing the contrast and the brightness) to create a simpler look that dips just a bit into the pop art realm. We were going to do single large transfers rather than the polka dot style Elsie used, so I reversed the images (since an iron-on creates a mirror effect) and printed them onto iron-on transfer paper using my color printer. 

Here's where we really got some good chatting in - it took forever! The instructions on the transfer paper said to press very firmly with the iron on a hard surface (not an ironing board) for 2 1/2 minutes, let the paper cool completely and then peel the backing off. 

We each ironed for at least 15 minutes before we were able to peel off the backing. For a short while, I was concerned the whole thing was going to be a crafting disaster. The key seemed to be the really hard surface (we switched from a table to an ironing board to my kitchen counter) and a little extra time because we were using a bumpy canvas material that had more difficulty accepting the transfer. 

Ultimately, we prevailed, and Jessica's thumbs up makes me irrationally happy every time I see it. 

So I'm curious. Who would you put on your bag? 

p.s. Easiest Fabric Napkins


Like what you just read? Share it with a friend! You can also follow ktmade on TwitterFacebook, or Instagram so you'll never miss a post. And you'll earn my undying affection!

Simple Weaving

Note for all my Feedly readers: I apologize for the inconvenience, but you must now re-subscribe to my feed. In the Feedly search bar, paste the following: http://www.ktmade.com/home?format=rss. There is now a link to my Feedburner RSS feed in the blog sidebar.  Thank you for following!

weaving.jpg

At a friend's house in middle school, I played with one of those little looms that kids used to make potholders. I don't know how I'd never encountered one before, but I was enamored by the way a simple over and under pattern with stretchy fabric loops could hold together to create something so thick and sturdy. 

Since then, looms and weaving have fascinated me. The end result seems magical. But beyond making a multi-colored potholder, I always considered weaving something that was done only on giant expensive looms by people with exceptional skill. I sought them out at craft fairs. I watched women in a dark little shop in Guatemala, adeptly sliding the shuttle back and forth. 

I actually considered buying a loom once when a coworker told me his mom was selling one (after I went on about my desire to one day weave), but I ultimately passed, primarily because of my penchant for purchasing craft-related things and then allowing them to languish. 

So when I started to see these weaving projects on the internet a couple years ago, I was intrigued. But it took me a while to jump on the bandwagon, mostly because the weaving I'd always appreciated was functional - making scarves or blankets or rugs. The artsy little wall hangings popping up on every craft blog seemed a bit weird to me. 

And then Elise Blaha Cripe created a massive one, and it triggered again that fascination with all things woven. Since then, it's been on my never-ending crafty to-do list, and I got very excited when I saw some tutorials for weaving without purchasing a loom (see purchasing penchant, above).

Last weekend I finally sat down with all the materials, created my little cardboard loom and got to sending that yarn back and forth. 

Oh boy, is this addictive. I wove for four hours straight, until I was finished. I couldn't stop. The  motion is meditative, like knitting is and crocheting has been for me. 

I used this tutorial and this tutorial primarily.

weaving.jpg
weaving.jpg


I'm pretty sure I completely screwed up getting it off the loom. The stitches are inconsistent, the fringe point is a little off-center, and I messed up a couple rows without realizing it. But I love it in spite of its imperfections. Or because of? I love it mainly because I so loved making it. 

The lighting in this room is terrible, so the pictures leave a little to be desired, but as I sit here on the couch, I'm looking at my weaving, my ticker tape quilt, my instagram magnets, and my rag quilt and feeling so much gratitude for materials to craft with, working hands, and a home to display the things I've made. 

weaving.jpg


p.s. You are so loved.


Like what you just read? Share it with a friend! You can also follow ktmade on TwitterFacebook, or Instagram so you'll never miss a post. And you'll earn my undying affection!

10 Awesome Craft Projects You Can Do In An Afternoon

I'm still working on my sweater a few rows at a time (but now on sleeves!), and my scrap blanket it still in the bag ready for knew knitted rows. But these long-term projects provide very little instant gratification. Sometimes I just need to whip out a project in an afternoon and feel awesome about it. I haven't been allowing myself the luxury of a quick and easy project since I really want to finish that sweater before I move on to something else. So like a dieter roaming the aisles of a chocolate shop, I've been thinking about all the projects I wish I were working on right now. 

Weaving From Playful Learning

I have been wanting to try my hand at weaving every since this project started taking over the DIY and craft blogs. I'm the perfect candidate with all my leftover scraps of yarn. All I need to do is make a little loom and get to it. This tutorial shows you how to make a loom from cardboard, which I have plenty of, so there's really no excuse for delay. 

Wool Blanket From The Purl Bee

I love the look of these wool blankets with the cheerful trim, and I've been telling myself I'd make some for the guest room for ages. The single layer blanket looks stunning but is actually quite simple. The problem: do you know how expensive wool is? Once I strike it rich, I'll definitely be taking this on. 

Pom Pom Coasters From Inspired By Charm

I can think of no good reason I haven't made these yet. They would take maybe 2 hours, and then drinking an evening cup of tea would be so cheerful! And I even have a set of drab coasters I could spruce up with these little pom poms. (Also, I like this project so much that I've pinned it twice.)

Hand-Painted Planter From Sand and Sisal

Our deck is freshly power washed and ready for a new stain and sealant and then maybe I'll finally add a little something functional and pretty, like a plant that repels mosquitos in a lovely little planter. I love the different colors and patterns and the idea of using something I already have. 

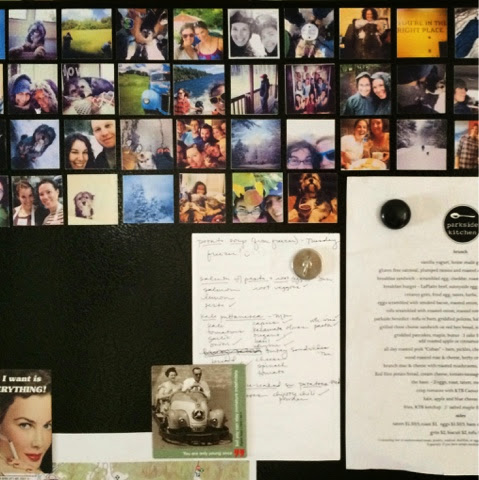
DIY Instagram Magnets from ktmade

I planned to make a bunch more of these after I made the first set, and I simply haven't set aside any time to make them. They're so simple, and I so enjoy looking at all the happy memories on the side of the refrigerator that I really need to hop to it. 

Hummingbird Feeder From The Garden-Roof Coop

We have one of those little plastic hummingbird feeders that's red with yellow "flowers" outside the kitchen window, and I love to see the hummingbirds come by. The look of the feeder itself leaves a little to be desired, though. Pretty ones usually cost upwards of $50. I can't get over how lovely this one is, and it's so easy (and inexpensive)!

Firefly Night light from Muy Ingenioso

I am deeply in love with this night light made from an old coffee can. Obviously it would be great for a kid's room, but I think anyone - young or old - would be delighted by a whimsical little light like this. 

Rope Coil Baskets from We Are Scout

I can never have too many little baskets to hold the odd assortment of things I have hanging around, especially in my studio. I've been wanting to make a rope coil basket (or two) for quite some time. This seems like a perfect project to make while watching a good old movie on a rainy afternoon. 

Hand-dotted Tumblers from Pop Sugar

I don't really have room in my kitchen cabinets for new little tumblers, but these are so pretty and simple to make that I might just have to throw caution to the wind and assume I'll find a place to put them. How fun would it be to use these at a dinner party and be able to tell someone I made them myself?

Stamped Tea Towels from Centsational Girl

These towels might be the simplest project on this list - it doesn't get much easier than stamping onto fabric. Of course, I might have to force myself to actually use them afterwards since they're so darn pretty. 

Hopefully I'll set aside time to make something this weekend!

p.s. For more of my crafting desires, be sure to follow me on Pinterest.

Like what you just read? Share it with a friend! You can also follow ktmade on TwitterFacebook, or Instagram so you'll never miss a post. And you'll earn my undying affection!

DIY Photography Background


This isn't a tutorial so much as a general description of this simple project, mainly because it was so easy that it didn't even occur to me to put it on the blog until my wife asked, "Are you putting this on the blog?"

By then I was almost finished, but I figured I'd snap a few shots of the final stages and share it here with anyone who's trying to find a super quick and inexpensive way to add a little diversity to their photography backgrounds for food or product shots. 

Because I had deconstructed a falling-apart shelving unit in our utility room, I had a pile of 2 x 4s just hanging out in my garage. So I spent zero dollars on this project, which was the perfect price point for me. 

Using a circular saw, I cut the boards so that they were all an equal length - 5 of them. My process was about as haphazard as you could get. I cut the first board about how long I thought I'd like it to be, and then I used it as a rough guide for the other cuts. Once those were done, I cut two other pieces a little shorter to work as the cross supports. 

I set down the support pieces parallel to each other about a foot and a half apart, covered the tops of both of them in wood glue and then laid each of the 5 equal length pieces perpendicular across those two support pieces. 

Then I put a heavy board on top of the whole thing (one of the shelves in the shelving unit I took apart), put some more heavy stuff on that and let it sit overnight so the glue could really do its thing. 

And it's the first time I took a picture: 


Fancy work space, huh?

The next day, I used some leftover white paint to give it a quick couple coats in the morning.


Then I came back in the afternoon and sanded it down very lightly with my power sander (but you could just use sandpaper) to give the paint a little softer look. 

And that's it. Aside from the time for the glue and paint to dry, I spent about an hour and a half on the project. 


I've been enjoying trying to improve my food photography game - it is not my strongest area, for sure, and having very little natural light in our house doesn't help. A portable background that I can carry outside or to whichever window is getting the best sun in that moment is quite useful. 


p.s. I've come a long from here (wheat-free yogurt pancakes).


Like what you just read? Share it with a friend! You can also follow ktmade on TwitterFacebook, or Instagram so you'll never miss a post. And you'll earn my undying affection!

Easiest Fabric Napkins


I went to a wedding last summer where the groom's mother made dozens of fabric napkins for the place settings, beautifully mismatched in as many different patterns. The bride was incredibly generous and sent me home with four dainty flowery ones, which I use for special occasions. 

Making some more to go along with those original four has been on my project list for almost a year. I don't know why it has taken me so long because whipping up a few of these fabric napkins is about the easiest and fastest sewing project you could imagine. Making hundreds for a wedding would take a while for sure, but I made 10 in less than an hour, with a little extra time for trimming the edges in front of the television. 

And now, not only are we being a bit more environmentally friendly, but I get to see these pretty fabrics on a regular basis instead of having them folded up in my studio. And I have enough that we don't have to save them for special dinners, and we shouldn't run out even if I'm behind on the laundry (and you know I am). 

If you're all set for fabric napkins at your own house, these would make a great hostess or housewarming gift. 


Easiest Fabric Napkins

Cotton fabric in a variety of patterns
Ruler
Rotary cutter or scissors
Coordinating thread
Pinking shears


1. Cut your fabric into a large square. I did this by folding from the edge into an even triangle and then cutting the two sides, which ensures that the square is...well, square. I used an existing napkin to get the size right.


2. Sew a simple straight stitch all the way around the edges of your fabric square with a 3/8 inch seam allowance. 


3. Cut the edges with pinking shears to avoid fraying. 


That's it! Now put one next to your plate and enjoy having something so pretty for wiping your hands! 


p.s. Embellished hand towels are another great way to get pretty fabrics into your everyday life.


Like what you just read? Share it with a friend! You can also follow ktmade on TwitterFacebook, or Instagram so you'll never miss a post. And you'll earn my undying affection!

The 13 Year Quilt


2002. Washington, D.C.


I was a graduate student - theater - living alone and far away from my family for the first time in my life. My studio apartment was 325 square feet, had a half-wall of tiny appliances, and was furnished (by my mom and me) with a futon, a rectangular card table, and a black and silver tv stand from Walmart. Making friends outside the dorm life of college was more difficult than I had expected. That first year, I spent many weekends by myself, watching a lot of television and channeling Mary Tyler Moore as I wandered the streets of Dupont Circle. 

I watched entire afternoons of HGTV. It was a little less trendy back then, and my favorites were the Carol Duvall Show and Simply Quilts. I crocheted while they presented holiday centerpieces and masterfully pieced together works of art. Quilting seemed out of my reach, requiring skills and paraphernalia I didn't have.

The day they shared the denim rag quilt and described it as a great beginner's option, I put down my crochet hooks and immediately searched for the episode and instructions on my computer.

To my weekend wanderings, I added thrift stores and the Goodwill, where I rummaged through piles of jeans and racks of shirts to find just the right fabrics to cut up.

I got a sewing machine for Christmas.


2004-2006. Silver Spring and Bethesda, Maryland. 

Kept company by Meredith Grey and McDreamy, I traced around the cardboard square template with a sharpie. Down the legs of a pair of men's Wranglers and up the back. With a good pair, I could get 12 squares. I needed 180 for the whole thing.

To my pile of thrifted plaid garments, I added the left-behind shirts of a former high school boyfriend and one of my college loves as well as two men's button-downs that I'd worn after coming out my senior year, a move that I had hoped signaled my newly-minted lesbian status to the ladies around me.

I bought spring-loaded scissors and kept a rubbermaid tub filled with denim and plaid under the bed I shared with my then-partner.


2007-2009. Washington, DC. 

The rubbermaid tub and my sewing machine sat in a series of closets as I moved from apartment to apartment with my then-girlfriend (now wife).

Law school left little time for crafting, and the piles of fabric looked to me old fashioned in the worst way.


2010. Washington, DC. 

My inner crafter, thought deceased, had simply been hibernating. She revived almost immediately upon graduation.

At the dining room table of our Logan Circle apartment, I oriented the sewing machine so I could stitch together squares while watching back-to-back episodes of Little House on the Prairie and waiting out the 5 months until my law firm job would begin.

"You've been carrying this all around for 8 years?" Navah asked, incredulous.

"Yep," I nodded.

"I didn't even know you sewed," She said.

"Yep."

Rows of alternating denim and plaid sprawled across the living room floor with numbered sticky notes pinned to their tops.

My sewing machine broke.


2015. Richmond, Vermont.

With a freshly painted craft room calling, I opened the old rubbermaid box. Nine rows of fabric stitched together and six waiting to be added.

I listened to the sound of the needle moving up and down through the layers of material and watched each pattern go by, remembering.

"I'm going to finish it," I told my wife. "And I think I might actually like it again - this whole denim and plaid thing."

She laughed and said she'd believe it when she saw it.

I shouted up from the studio - "Finished!" - when I pulled the last bit out from the sewing machine.

I snipped the seams for days (weeks?), through Modern Family, Six Feet Under, The Good Wife, BoyHood, Top Five, Scandal, Interstellar. I bought new spring-loaded scissors, these specific to rag quilts and the primary reason that I can still use my hands after cutting 10 little snips in every seam.

The couch, the floor, the table, my clothes, Navah's clothes were all covered in tiny little denim threads. "The cost of art," I said.

Two cycles through the washer and dryer, carefully cleaning out the lint filter every 15 minutes, and it was over.


13 years older and 500 miles further north, I am sitting under this beautiful fabric time capsule as I write these words.

I think I'll call it my gratitude quilt - for all the days and weeks and television shows and friends and loves and thrift stores and scissors and sewing machines and rubbermaid tubs that traveled alongside me to this moment with the sun not quite up, my dog on the floor beside me, my wife asleep down the hall, and the only sound the tapping of my fingers on the keys.


p.s. The first quilt I ever finished

Like what you just read? Share it with a friend! You can also follow ktmade on TwitterFacebook, or Instagram so you'll never miss a post. And you'll earn my undying affection!

Easy DIY Instagram Magnets


I have taken thousands of photos on my phone. Tens of thousands. And I've shared many of them with the world through my Instagram feed. But once I put them out there, they get shuffled to my Instagram archive and out of my mind.

I wanted some way to display a bunch of them in my house because so many inspire happy memories of fun times. Or adorable pictures of my dog that should be visible as a reminder not to murder him when he's being a jerk. Magnets came to mind because the side of our refrigerator is a big blank magnetic canvas that sits in the middle of our primary living space. 

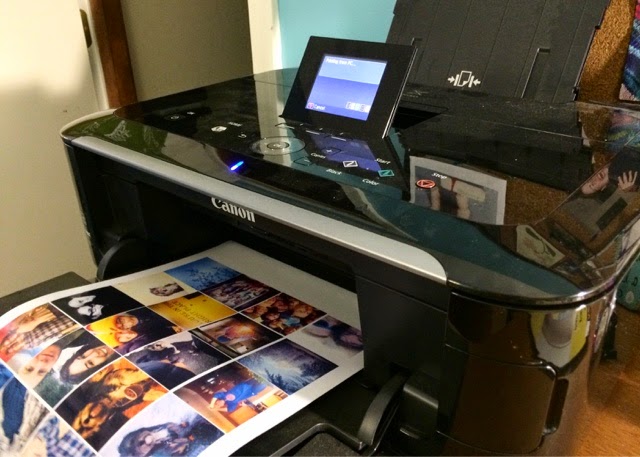
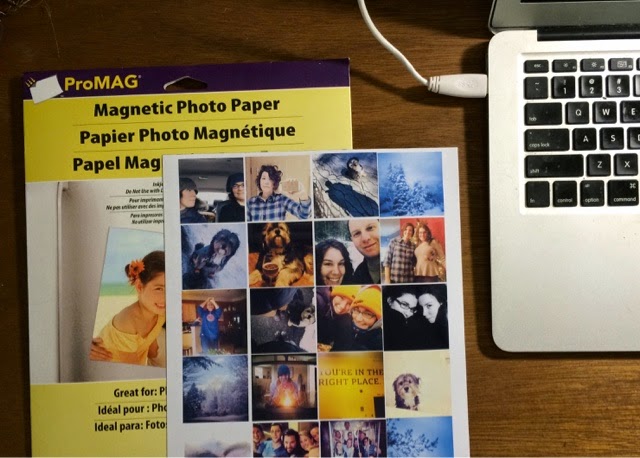
I went to Michaels to see about the magnet situation and was absolutely delighted to find entire sheets of magnetic paper that can simply be run through a printer. Hence began the absolute easiest DIY Instagram magnet project. The biggest amount of time went to figuring out which pictures I wanted to use. 


Easy DIY Instagram Magnets 
Important Note: You can make these even if you think you are not "creative" or "a crafter." Go make some.

1. Choose your photos. If they're not already on your computer, you might need to use an Instagram photo downloader. Most of mine were already on my laptop because it syncs automatically with my camera roll when I plug in my phone. But for some reason, a few were missing, and I used Instagrabbr to get those photos.  

2. Once you've chosen your photos, pull them all up in a photo editor. I used Photoshop, but you can use PicMonkey or Picasa or another similar free editor. Begin to make a contact sheet by dragging and dropping the photos onto a blank 8 1/2 x 11 page. 


3. Resize all of the photos. I sized mine 2 inches x 2 inches. To do this in Photoshop, hit control +  t to select the image and then set your width and height up in the top left corner. Then fill up your page with your images. 


4. Once you have your contact sheet(s) made, load the magnetic paper into your printer and print each sheet out according to your printer settings. You'll likely need to load the paper into a side or back feed rather than the normal paper tray.


5. Voila - sheets of magnetic photos!


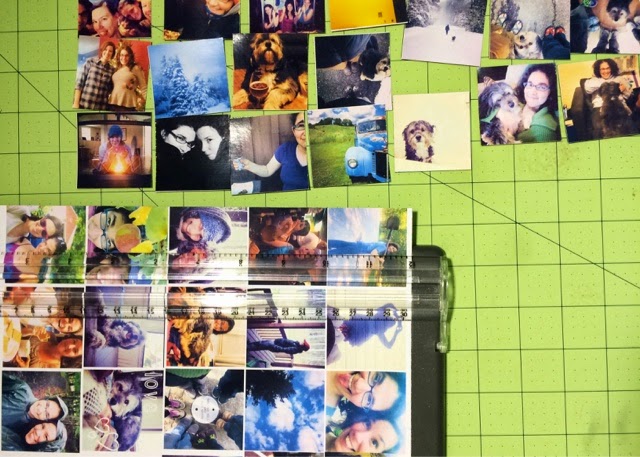
6. Cut out each square magnet using a paper cutter, scissors, or an exacto knife. My little Fiskars paper cutter worked perfectly to cut out each square. 


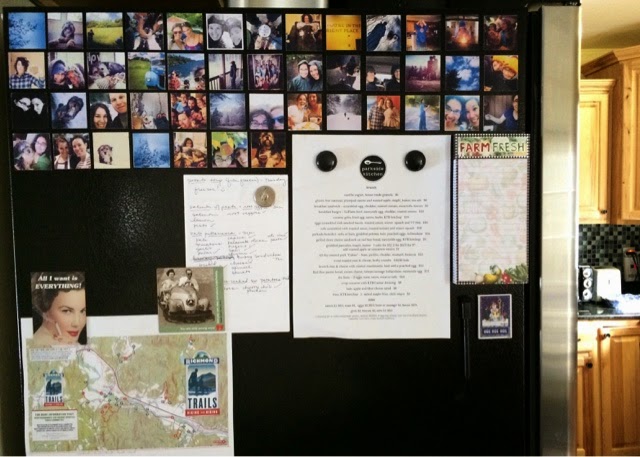
7. Once all of your squares are cut out, hang them somewhere you'll see them everyday!

I adore having these photos out in the open and seeing them as I walk through the house. And I'll definitely be making more because now I have a vision of the entire side of the refrigerator covered in these little happy tiles. 

The whole project only took about 2 hours, and that was mostly because I labored over which pictures to use. Even so, time well spent!


p.s. Back when I was using an Android phone


Like what you just read? Share it with a friend! You can also follow ktmade on TwitterFacebook, or Instagram so you'll never miss a post. And you'll earn my undying affection!

Painted Clementine Box


It took me forever to give clementines a chance. I've always hated tangerines (still do), and clementines looked way too much like tangerines for my comfort. But one day at work many jobs ago, a coworker offered me a clementine when I said I was hungry and had forgotten to bring an afternoon snack. I didn't want to be rude, so I took it. Of course, it was amazing. 

Now when clementines are in season, I eat at least two of them every day. Maybe four. It depends on how snacky I am and how sweet the particular batch I got is. Some days I feel like they're the only positive element of winter - that and getting to wear chunky sweaters.

Every now and then I buy them in one of those orange netted bags, but usually they're in a wooden box. By the end of the winter, I've thrown away perhaps a dozen of them. They're not recyclable (at least not here), and I feel terrible about it. So I've started to put them to use as storage containers. 

I had a perfect spot for one at the bottom of the new multi-shelf floor lamp in my studio, but it needed to look pretty. So I did a quick paint job, and now it's holding all of my stamping supplies (of which I have a surprising amount) and looking good doing it. 

You may have noticed a theme with my craft projects. For the most part, easy is the name of the game for me. It's not that I don't love more involved projects. It's just that I have a hard time finishing them - they're all in partially completed form in rubbermaid containers in the closet. Whoops.

No need to put this one away for later. You can finish it in an hour, tops. And most of that time is waiting for the paint to dry. 

Materials
Clementine box
2 bottles of craft paint in coordinating colors
paint brush
painters tape 


1. Tape diagonally from corner to corner across each side of the clementine box to mark off the bottom section of the box. 


2. Paint the taped off bottom section with your first paint color. I chose a metallic gold. 


3. Once that has dried, remove the tape and then tape again across the straight line of that gold paint from corner to corner to mark off the top section of the box. 
4. Painted the taped off top section with your second paint color. I chose a soft purple. 
5. Once that has dried, remove the tape and voila! 


Note: You could paint the box all over, then tape off the bottom section and paint that in the coordinating color to save yourself the effort of taping twice. But since the taping doesn't take much time and cuts down on the amount of paint I use, I went that route. 


It fits perfectly on that last shelf of my new lamp and corrals all my stamps and ink pads, which had previously been floating around in a giant bin that had a random assortment of crafty things. Organization win!

p.s. That crocheted bag. The sewing machine. The needlepoint save the date. 

Like what you just read? Share it with a friend! You can also follow ktmade on Twitter, Facebook, or Instagram so you'll never miss a post. And you'll earn my undying affection!

Wooden Over-the-Door Sign Tutorial


I'm love love loving my THIS IS THE DAY wooden sign. I feel like it's cheering me on as I get ready for work in the morning. 

It was super easy to make, and I'm guessing there's a door in your house that could use a little up top decorating. So here's a quick and dirty tutorial to make your own over-the-door painted wooden sign. (I was inspired by this gorgeous table project from Domestic Imperfection.)


Materials
1 x 4 wood cut to width of doorway (mine was cedar cut to 2 ft)
White craft paint 
Paint brush 
Wood stain in color of your choice
Foam brush 
Paper towel
Printer 
Tape
Paper cutter or scissors 
Power sander or sandpaper 
Carbon tracing paper
Large sawtooth hanger

1. Lightly sand your wood board, either with sandpaper or a power sander. This doesn't need to be perfect. Just remove the rough edges.

2. On your computer, type out the words you want on your sign and choose a font. Increase the size so that the letters are slightly less than 4 inches tall and will fit lengthwise across your board. Because I was trying to save paper and not do a bunch of trial and error printing, I set my page view to 100% and put a ruler right up to the computer screen. 

3. Print out your words and cut off excess paper. Getting your cuts nice and straight at this stage will make things easier in the next step. I used a paper cutter. 

4. Tape the words together, leaving appropriate space in between words and then tape the whole phrase down to your board just on the two short sides. Because my paper edges were straight and even, I was able to line them against the edge of the board to make sure the phrase would be straight. Center the phrase by measuring the distance from the short edges. 

5. Slide your transfer paper underneath the printed paper taped to your board so that there is a layer of transfer paper between every letter and the wood board. (And please take note of my awesome vintage carbon tracing paper, a gift from my stepmom.)


6. With a pen or pencil, carefully trace around the edges of all the letters. When you're finished, remove the papers and transfer paper, and you should have transferred an outline of the phrase onto your board.


7. With your white paint and paint brush, fill in the outlines of all your letters. You may need multiple coats. Allow the paint to dry as long as necessary, according to the instructions on the bottle. 

8. Once the paint is dry, cover your work surface and brush your stain onto the board with the foam brush. Allowing coats to dry slightly in between applications, brush on stain as many times as necessary to achieve your desired color. 


9. Once the stain has dried, find the middle of the board and attach the sawtooth hanger. 


10. Hang in a perfect spot over your door. 


p.s. I love this almost as much as my needlepoint save the date, and this sign was way less time-consuming.

This Is The Day


Growing up, I loved the summer days I spent hanging out in church auxiliary rooms at Vacation Bible School. If you're not familiar, VBS is essentially a week-long day camp where you make craft projects and play games and learn some Bible stories. 

And you sing. 

At the end of each day of Vacation Bible School at my Methodist church, we'd file into the pews in the little chapel and sing camp songs. This was my favorite part. 

This was the part where your teacher might put her hand up to her ear in the universal sign for I Can't Hear You, Please Shout At The Top Of Your Lungs. And fifteen little seven year olds would gleefully throw their heads back and yell out the words to This Little Light of Mine until they were hoarse. 

As an adult, you're expected to hit the right note and keep your voice as clear and soft and in tune as the voices around you. As an adult, you're expected to regulate. Don't get me wrong - I love singing in choirs and making beautiful music. I love harmonizing and the goose bumps that come from a perfectly executed pianissimo. 

But shout-singing, that realm of the uninhibited child, has always felt a bit like prayer to me. 

One of my favorites was a call-and-response style number with these words: 

This is the day
That the Lord has made
Let us rejoice 
And be glad in it.

I taught it to my wife early on in our relationship by shout-singing it one morning to pump myself up before classes. By then I had changed "the Lord" to "God" in my own rendition. It didn't take Navah long to learn the basic tune, and it quickly became a staple get-pumped-for-the-day song around our house. One of us takes the leader lines, the other repeats back with gusto, and when we get to the words that call for unison, we each try to sing-shout louder than the other as I yell THIS IS THE DAY THAT GOD HAS MADE and she yells THIS IS THE DAY THAT HASHEM HAS MADE (because that's how you do interfaith right). Jammer wags his tail.

It's silly, and it's also my most joyful prayer. It's a thank you to God (who or whatever I believe that to be on my ever-evolving faith journey) for this exact day, a reminder to myself that there is hope and possibility in the act of waking up to a new sunrise, that there is something inherently magical about being alive to experience this life, that happy shouting is a heart opener. 

When I started thinking about a project for over the doorway in our main living space, I knew immediately what I wanted - a symbol not just of the potential in every day, but of the joyful exuberance of the little seven-year-old I still have inside me. 

I painted and stained this wood board with the line THIS IS THE DAY over the weekend, and when I stepped back from hanging it up, I squealed and giggled involuntarily. 

Yes. 

This is the day. 


p.s. Another of my favorite childhood songs

DIY Word Art


My gorgeous studio has one giant wall, and I'll admit to being overwhelmed by it when it came to figure out what to hang there. I thought about doing a gallery wall again, but it seemed like it would be too much in the space. I intentionally chose a lot of color for my studio, but I also need there to be some breathing room in there. And when I pictured a thousand frames on the wall, I felt claustrophobic.

Instead I wanted one large, simple piece that inspired me. And since I had already spent a bundle on paint, I decided I'd make it myself (after getting an inexpensive 50% off canvas at A.C. Moore).

Here's how I did it:

Supplies:
Metallic craft paint
Painers tape
Pencil with unused eraser
Something to pour paint onto (can be as simple as a paper plate)
Pencil to write with
Sharpie
Ruler
Canvas

1. Pick a bowl that has a rim the width of the circle that you'd like to use on your canvas. Using painters tape and a flat surface (like a floor or counter), tape out a large enough square that you can draw the outline of the bowl on the square.


2. Draw the outline and cut out the circle.


3. Using a tape measure diagonally across the canvas, mark the center with a pencil. (Sorry I didn't get a picture of this!)

4. Place your circle of tape onto the canvas so that the center is directly in the middle. This took a little maneuvering for me. I measured until my center dot was directly in the center of the circle.


5. Dip the unused eraser of a pencil into your metallic paint and press it onto the canvas to make a dot outside the circle marked by your painters tape.


6. Continue to make dots across the canvas in the pattern that you'd like. I made dots somewhat randomly across the whole canvas (minus the circle) and then went back in closer to the circle and added more, gradually decreasing as I got closer to the edges of the canvas. I also went in with a second color (gold glitter) to add more dots.


7. Place a piece of tape straight across the center of your circle. Use a level if necessary to make sure that it's straight. Then, using a pencil, write out whatever word you want to put inside the circle. Paint over your pencil lines with the metallic paint.


9. Wait for the paint to dry, pull off the painters tape, and hang your artwork.


I'm hoping that the single word there reminds me that my purpose in this studio is simply to create. It's not to create beauty or create magic or create perfection or create anything in particular at all. It's just to create - whatever that means at any given moment. 


p.s. I like words on canvas - I made this piece a couple years ago, and it's hanging in my bedroom now.

Crafting Mistakes (Baby sweater for a friend)

MISTAKE
transitive verb

1: to blunder in the choice of
2a: to misunderstand the meaning or intention of
  b: to make a wrong judgment of the character or ability of 
3: to identify wrongly, confuse with another 

Merriam-Webster 


None of us wants to make mistakes. I mean, we might give some lip service to the notice of a mistake as a learning experience, but none of us goes into a project thinking, "Boy, I hope I blunder in the choices I make on this one!"

In fact, most of us begin every day of our lives with the desire to get it right across the board - to make the correct judgments, to understand completely, to be infallible. Whether we recognize that as a real possibility is beside the point. We want to be mistake-free. 

And it is, of course, worse for some of us than for others. We perfectionists have a more difficult time. Disorganized, impatient perfectionists like me have it particularly bad. 

Did you know there were disorganized, impatient perfectionists out there? 

We're the folks who never follow the advice "measure twice, cut once" because that takes too freaking long. Yet we expect our projects to turn our perfectly anyway, with no incorrect cuts, no mistakes. 

This turns out to be a major issue for me - this desire to never make a mistake combined with a shortcut work ethic for my hobbies and home projects. The result is often tears or cursing after putting a great deal of work into something that turns out not to be quite right - like this skirt I made a few years ago with not enough fabric (resulting in - shocker! - a too-short skirt).

But then sometimes, on that rarest of occasions, I make a mistake on a project that actually turns out to be in that genre of fairytale mistakes, where I can say it's truly better the mistake was made because the result, surprisingly, is superior to what might have been. 

And this tiny sweater for my friend's new, precious little baby boy is exactly one of those mistakes. 

I spent many hours knitting this cute cardigan (called Felix's Cardigan on Ravelry) only to find myself with one and a half sleeves and no more yarn. No big deal, I thought to myself, as I drove to Creative Habitat, our local craft store, for another skein. Except it had taken me so long to knit the sweater that the store had run out of that particular yarn color since I'd first purchased it. No big deal, I thought to myself, as I drove home to purchase a skein of it online. 

Except that when I got home, I couldn't find the tag that had been wrapped around the yarn, so I didn't know exactly what color it was. I went online and perused all the different possible colors and chose one that looked correct. Of course, when it arrived it was entirely wrong - you can't trust the colors on the screen.

So I put the little sweater aside, frustrated and angry with myself once again for not being more careful when I bought the yarn in the first place (either by buying enough or by at least keeping the tag). And it languished for a month or more.

But then! Glory of glories! My wife randomly found the tag while she was cleaning, and I hopped straight to the web and bought a new skein and wrote the dye lot number into the comments and waited impatiently for the mail. 

When it came, I headed straight for the couch and knitted up that second sleeve. 

Except something wasn't quite right. The color, to be exact, was not quite right. Of course I hadn't checked when the new skein arrived that it did actually have the same dye lot as the old skein (for non yarn crafters, having the same dye lot number ensures that your color will match when you're using multiple skeins of yarn for a project). And they didn't. So the sleeve was partially one color and partially a very similar but slightly different color. My wife swore she couldn't really tell (unless she looked very closely), but I could tell. 

So I angrily set it aside again until my mom came to visit and made the brilliant suggestion that I add some embellishments to the sweater to distract from the slight color variations. I spent some time online figuring out how to add embroidery to my knitting, picked a color, and began embellishing my little heart out. 

And folks, it's a winner. 

Blunder after blunder, and in the end, it might be the cutest thing I've ever made. 

Yep. I fairytaled the sh*t out of that mistake. 


p.s. If you'd like to see other ways I'm a total mess, check out this oldie but goodie from a couple years ago. 

Pillowcases for Hannah


If you've been reading my blog for a while, you know that I traveled to Rwanda last year to visit my sister who was doing a fellowship there.  And you know that I organized a drive for cheerful handmade pillowcases for the pediatrics ward at the hospital where she volunteered.  The drive was a huge success, and we handed out dozens of lovely pillowcases to very appreciative kids and parents.


And then my sister put in a request for some unique pillowcases for her own bed after she returned to New York City for graduate school.  It took me a few months, but I finally got down to business, pulled out the sewing machine, and made two coordinating pillowcases using this tutorial.


Hannah picked out the wide band of trim fabric for each pillowcase while I was visiting her in New York during the fall - from Purl Soho.  And then I picked up the coordinating fabrics at JoAnn Fabric.  I was so excited to find two with the same pattern that worked so well with the different trims.


They spruce up her simple navy duvet cover beautifully, if I do say so myself!

Hannah's had that bunny since she was born!  

Knitting, finally


I finally did it - signed up for a knitting class.  I taught myself to crochet with a book, but I never could figure it out that way with knitting.  Now that I've begun, I can understand why.  It's much more challenging.

I'm two weeks into the three week class, which should mean that I'm 2/3 of the way finished.  But it doesn't.  I was the only person to show up to the second class session without my "homework" finished.   

After being away in New York for the weekend (without my knitting because I was afraid TSA would confiscate my needles) and then busy when I got back, I just didn't have time to finish.  

So that means that I have to finish another five or so rows of knitting and then hope that I can remember how to bind off the little section that will be a button tab and then do the knit stitch that, combined with the purl stitch, will create a stockinette stitch to begin the final section of my hat. 

Eek.

Thank goodness for youtube videos.  I'm pretty sure I'll be watching a lot of those this weekend.

What are your plans for the weekend?


Katie 


Quick and Easy Stamped Thank You Cards


Of course there are a lot of lovely thank you cards out there, but I was so deep in the crafty spirit before the wedding that I was excited to make my own.  

I knew I didn't have much time, so they couldn't be little thank you card masterpieces.  I needed a way to make something I thought was pretty and unique but could be made in quick succession. 

Thus, the choice for stamping the cards.


I bought a stamp and the acrylic block to mount it on at Michaels, along with cream colored cards and envelopes, and stone gray StazOn ink.  I went with gray instead of black because I wanted something a little softer and more elegant.  

The stamping itself was simply a matter of...well...stamping. 

I made most of them with one simple "thank you" in the bottom right of the card, but I really liked a few that I made with "thank you" all over the front.  


With scrap paper underneath, I let the "thank you" overlap off the card and spaced them kind of randomly.  

So far no one's actually received my stamped thank you cards yet since I've been terrible about actually getting the addresses on the envelopes, but I hope folks will like them when I finally put stamps on and get them out the door!


Katie

Fabric for the Wedding Quilt


I've known that I wanted to use squares that would be made into a quilt as our wedding guest book ever since I saw this one by Cute + Delicious.

I had seen various others during my meanderings around the internet, but I was always on the fence. But when I saw Alix's, I was sold.  Her decision to use patterned pieces and have the guests just scribble in where they could find room (or over the pattern) made for such an organic-looking finished product where the pattern was the focus, but if you looked more closely, you realized there were all those lovely signatures.

It was exactly what I wanted for mine. 

So over the weekend, I headed to Stitched, a fabulous boutique sewing store about fifteen minutes from where I live.  I'd never been and somehow didn't even know it existed for the first six months that I lived here, which is a travesty.  Of course now I can't wait to get back from the honeymoon and gorge myself on fabric, but that's a story for another day.

These patterns in the teal and red colorway from Michael Miller Fabrics caught my eye right away, but I was concerned they may look too childish.  After talking it over with the owner, I decided that was a-ok.  We agreed that a wedding quilt is all about celebration and magic, and what is more celebratory and magical than a pinwheel?  Seriously?

Also, our whole wedding weekend is at a summer camp, so we've sort of headed down the youthful delights path anyway.

After spending an hour or so cutting out the squares, I'm 100% sold and just excited to have everyone sign them and then start to make a quilt that we'll treasure forever!


Katie


Burlap Inspiration

Last night I was up to my elbows in burlap, our apartment filled with the earthy smell.  And my fingers cramping from cutting.

I hope to share a tutorial for my simple fabric runners when I'm back from the wedding and honeymoon (the runners are for the reception).  But for the moment, here are some burlap inspiration photos for those of you who are planning a wedding or for those of you who, like me, just can't get enough of that scratchy weave.


Image credits: 1/2/3/4/5

Katie

(In an operatic tone) Taaaaaa DAAAAAAA


It's finished. 


After many, many hours - I estimate somewhere around 20, maybe 30, spread out over three months - the table is complete. 


And I'm quite happy with the result. 


There were a lot of snags along the way, and it took me much longer than I anticipated.   Even now, it's not perfect.  There are some weird marks from the staining - I think because the wood conditioner might not have been completely dry in some places.  And the polyurethane job is far from flawless. 


But, as Navah keeps reminding me, it was my first piece.  They'll get better in the future. 


Here's what I learned about refinishing furniture:


1.  Never refinish furniture in your dining room (probably not in other rooms either). It's annoying and smelly, and even if you put a drop-cloth down, sawdust and stain and polyurethane will inevitably get in places you don't want them.  


2.  It always takes longer than you think.  However long you think it will take, triple it. 


3.  Check what grit sandpaper your power sander will accept before you buy it.  And your best bet is to buy a sander that accepts a universal size sandpaper.


4.  Sand by hand before you stain


5.  If you're using wood conditioner, let it dry for at least 45 minutes before you start staining.


6.  Make sure your brush is absolutely 100% clean before you apply your second (or third) coat of polyurethane. 


7.  Don't expect perfection - unless, of course, you know what you're doing. 


Thanks for all your suggestions and support along the way!


Now it's time to find some chairs. 


Katie 

Happy 4th of July! I hope you're all reading this on your phones or something while you eat barbeque!

Amy Palanjian's So Pretty Crochet


I'm so excited to share with you a new crochet book from my friend Amy Palanjian.  If you've been in need of some yarn-y inspiration (or even if you haven't), you're going to want this book. 


As soon as I saw the cover, I knew I was going to love what was inside.  The gorgeous, feminine take on a traditional crocheted item, with its soft scalloping and the perfect addition of a simple lambskin bow is indicative of what's in store once you open the pages.  Each piece - by twelve different artists - is perfect in its intentionality.  And there's not a single afghan among them.  Though many of the creators were taught and inspired by mothers and grandmothers, the crochet projects featured are decidedly modern.


The innovation in this one category of craft speaks to our growing need to balance our modern, busy lives with physical handiwork.  More and more of us feel a deep need to make things with our hands in order to feel grounded in the rest of our lives.  It helps us to feel a sense of accomplishment - to calm our minds with deliberate (and often repetitive and soothing) work.  Considered this way, the act of sitting down to crochet a new necklace or a table runner is almost an act of self-preservation.  And increasingly, it's a way to show the world who we are and what we're capable of - on our own creative terms. 


Amy begins the book with a brief introduction to crochet, definitions of some of the basic terminology, and a quick run-down of the various options in yarn weight. And then she gets straight to the really good part.  From necklaces and wrist cuffs to nesting bowls and rag rugs, the pages are filled with stunning photographs and patterns that will make you want to pull out your crochet hook right. now. and start creating an accessory that will turn heads. 


But the book isn't all pretty pictures.  Amy shares a bit of the story behind each artist.  When you've picked a project and you're ready to sit down with a ball of yarn, you'll know who created that pattern, where she lives, and why she crochets.  In the blog world, we have always felt a connection to the creator of the patterns we love, but that has remained somewhat absent from traditional how-to books.  Thankfully So Pretty Crochet crosses the divide by providing insight into the artists' lives alongside instruction.  


One word of caution for the beginner crocheters out there - the book is not geared toward novices.  While Amy points readers to several websites and youtube videos that offer instruction, the patterns themselves require at least a basic familiarity with crocheting and handling a hook.  There are no step-by-step diagrams or mid-process photographs.  As someone who taught myself to crochet with a book, I always think it's good to start off the learning process by working through a bunch of the basic stitches so that you're not completely learning a new stitch each time you try to pick up a new pattern. 


So Pretty Crochet concludes with a section on where to source yarns, particularly if you're interested in organic or specialty yarns, which will be helpful for those who are looking for something more special than what their local Michaels carries. 

I'm guessing that once you finish the book, you'll be itching to go buy yourself some pretty skeins and start planning out a project. I know I've set my sights on one of the necklaces.  Or maybe that awesome braided bracelet. Or the flower headband. 


There are so many options, it's hard to choose. 


Amy has certainly put together a book that will make you excited to grab your crochet hook and make something so, so pretty.


Katie 

*I was not paid for this review, but I did receive a complimentary copy of the book.