
Doggie Bag Dispenser (With Tutorial)
/
Picking up poop is not my favorite part of being a dog owner. But stepping in poop is worse, so there's no question that we city-dwellers must properly dispose of our puppies' little treasures. When we first got Jammer, our plan was to use old plastic bags. We had plenty of them, but I soon discovered a fatal flaw in the plan. I was terrible - like ridiculously, embarrassingly, sadly terrible - at remembering to bring them with us on our walks. Twenty minutes into the walk, I would inevitably remember that I didn't have a bag. On the good days, there was a friendly fellow dog-walker out with an extra bag to loan me. I hoped it wasn't the same person who had loaned me a bag the day before. On the bad days, I scooped up poop with a random piece of newspaper lying on the ground or the ziploc bag that was storing doggie treats in my pocket. It wasn't pretty.
Eventually we gave in and bought one of the little bag dispensers that everyone seemed to have. They're extremely convenient - they just clip right on to the leash, so you always have a bag handy. But you have to buy the refill bags, and we have tons of bags just sitting in our pantry waiting to pick up poop. Even though our local grocery store no longer uses plastic bags for the groceries, we still have vegetable bags and the bags from loaves of bread and little bags from the farmers market. It just seemed like such a waste.


So I decided to take matters into my own hands and make a little doggie bag dispenser that we could attach to our leash and stuff with old plastic bags. I modeled it after those fabric plastic bag holders that have elastic on either end - we had one hanging up in the laundry room when I was a kid. The one I made is now holding five bags, and I'm totally delighted with it!
Here's the tutorial:
Doggie Bag Dispenser
Materials:
1. One piece of fabric cut 5 inches x 7 inches. I used pieces of an old plaid shirt that I had leftover from another project.
2. 1/4-inch elastic cut into three pieces - 4 inches, 2 1/2 inches, and 3 inches.
3. Thread
4. Safety pin
5. Sewing machine (although I guess you could also do this by hand)
Step one: With the wrong side of the fabric facing you, fold one side of the long end (the 7 inch side) of the fabric toward you about 5/8 inches and pin. If you want to be really neat about it, you could iron it down, but I was feeling more speedy than neat. If you're not super comfortable with the sewing machine or feel concerned about sewing a straight line very close to the edge of the fabric, then give yourself a bit more room to work with by folding the fabric over 1/2 inches.
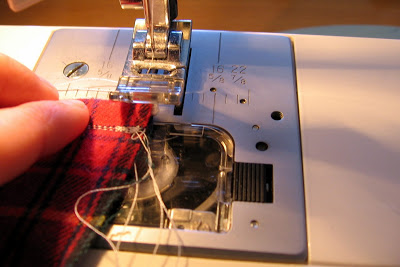
Step two: Sew along the raw edge of the fabric that you just folded down, backstitching at each end. I stitched it twice because I wanted to make sure the seams would be extra sturdy for all the wear and tear that they'll get. Make sure that you sew far enough away from the fold to allow the elastic to fit through the channel.
Step three: Repeat steps one and two on the other long end of the fabric.
Step four: Attach a safety pin to one end of the 4" piece of elastic and thread it through one of the channels that you have created until the other end of the elastic (that doesn't have a safety pin) is flush with the edge of the fabric.
Step five: Stitch the elastic to the fabric, being sure to backstitch.
Continue threading the elastic through the channel. Once you pull the elastic all the way through, stitch that side to the fabric as well. You should have a little gathered channel on one end of the fabric.
Step six: Repeat steps four and five with the 2 1/2" piece of elastic. You might have to struggle with your sewing machine a bit to get it to sew over the gathers once you've pulled the elastic all the way through. I sewed over it a couple of times just to make sure it was secure. Now you should have two gathered channels, one being more gathered than the other.
Step seven: Fold the 3" piece of elastic in half and pin it to the right side of the fabric in the middle of the two gathered sides. This will eventually be the loop that you can hang the bag dispenser from.
Step eight: With right sides together, sew a 5/8" seam to close up the bag dispenser. Be sure to backstitch, and I stitched twice to make it extra sturdy. Turn right side out. And there you have it!
I had a little carabiner lying around, and I hooked it to the loop and attached it to my leash.
Even Jammer thinks it's pretty awesome (that's his I-think-this-is-awesome face).
Katie


