
How to Make a World Map Seating Chart
/
When I saw this image on Pinterest, I knew that I had found our seating chart. But the picture didn't lead anywhere, so I had to figure out how to make it.
It turned out to be quite simple, if a bit tedious. It also turned out to be my favorite project of the wedding.
So if you're thinking of making one yourself, I say go for it! But give yourself several hours.
World Map Seating Chart Tutorial
Materials:
World map
One piece of foam core cut to the size of the world map
One can Aleene's Tacky Spray
One box of quilting pins
Bakers twine
Card stock
Pen
My local Michaels cut the foam core to size for me.
I used Aleene's Tacky Spray to affix the map to the foam core, following the instructions on the back of the can. Then I laid it flat with something heavy on top and let it dry for 24 hours.


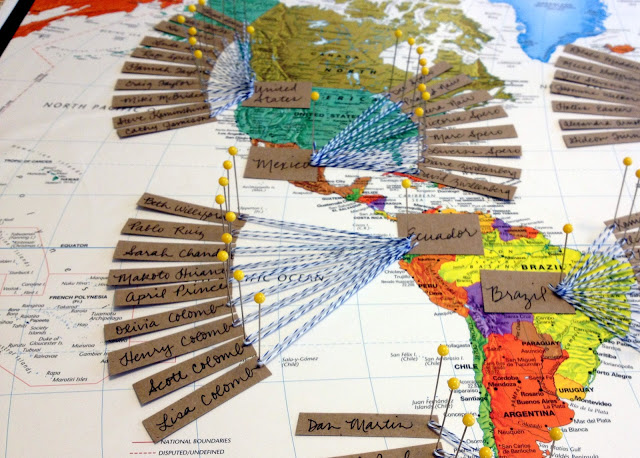
I liked the look of simple kraft paper for the names of the guests and the countries, so I cut little rectangles from some tan card stock that I had on hand. I used a basic black gel pen to write all of the names in cursive while we watched an episode (maybe 2?) of Mad Men on Netflix.

I had made our original seating chart - just for figuring things out and being able to move names around - on a piece of poster board with sticky notes. So I used that as reference originally so that I knew how many tables we were going to have and how many people would be sitting at each.

That way I could arrange things on the world map and figure out where they would all fit and choose countries accordingly. I would have liked to choose countries based on our travels or special places, but I ended up making the decision based, for the most part, on where the names of the guests would fit.
Once I had that figured out, I laid all the guest names and country names in the correct positions on the world map and pinned every piece of card stock down the map. Make sure you have something protective underneath if you're working on a nice surface.

Once everything was pinned down, I pulled out one of the country pins and tied the end of my spool of bakers twine to that pin and then poked it back into the country name on the world map.


Then I simply wound the spool of twine back and forth through all of the pins for the guest names.


And finally I cut the twine and tied a final knot on the original country pin.

Then I snipped the ends of the twine, and I moved on to the next country.
And there you have it - just like that, and it was finished.
One word of caution. Our wedding was during a pretty rainy weekend. The map got a little ripply, I suspect from the humidity. I still thought it was fabulous, but it's something to be aware of when you're choosing what adhesive to use.

My friend Katie - one of the many helping angels who lent their hands in the weeks and months before the wedding - made matching country signs for each of the tables.

I was so pleased by how all the seating arrangement crafts worked out. Of course the love and joy in the room were the important things, but I sure liked looking at that map!
Let me know if you make one - I'd love to see how it turns out!
Katie


