Chocolate Raspberry Chia Parfait


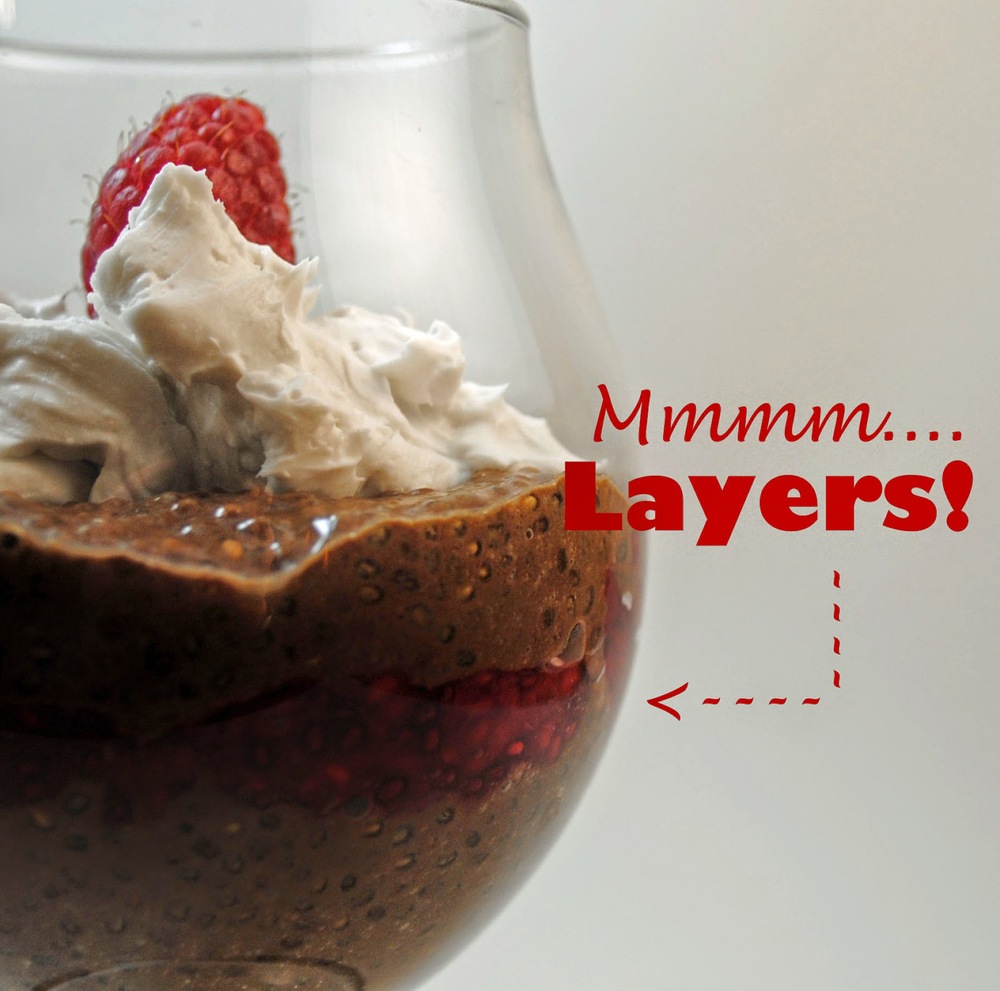
What is it about layered desserts that sets my mouth watering? I've always loved the process of dipping down into a parfait to get a little bit of each delicious element on a single spoonful. There's a bit of a challenge built into every layered dish - can you eat this is just the right ratio that every bite has a little bit of every thing until the very end?

Just me?

This chocolate raspberry chia parfait was the most delectable challenge.


If you're not familiar with chia seeds, they look like...well, like teeny tiny little seeds. But when they mix with liquid, they puff up and become a little gelatinous - a bit like a smaller version of tapioca. And I love tapioca. They're also crazy good for you with all their fiber and calcium.

So when you eat this parfait, you can pat yourself on the back for making excellent, healthy food choices.

Chocolate Raspberry Chia Parfait

Chocolate Chia Pudding Layer:
2 cups almond milk
3 tablespoons chia seeds
3 tablespoons unsweetened cocoa powder
2 tablespoons maple syrup
1 teaspoon vanilla extract

1. Quickly blend all ingredients together in your blender and then pour into a bowl with a lid. (If you don't have a blender, you can stir them all together - the cocoa powder will be a little difficult to incorporate.)
2. Place in the refrigerator overnight or for at least 2 hours.
3. For the raspberry chia jam layer and the whipped coconut cream, follow this recipe (just the jam) and this recipe from Oh She Glows.
4. Once the chocolate pudding layer is set, place a few tablespoons of the pudding into a pretty glass, then a couple tablespoons of the raspberry chia jam, then a few more tablespoons of the pudding, and then top with a dollop of whipped coconut cream and a raspberry.
5. Serve and enjoy!

p.s. Want more chocolate? I've been thinking about these almond butter and jam chocolates a lot lately...


Like what you read? Never miss a post: follow me on twitter, instagram, or facebook

New Favorite Meal: Chipotle Twice-Baked Sweet Potatoes


There are some meals that are always in our regular rotation.  Pasta and spaghetti sauce.  Vegetarian chili.  Bean burritos. A simple tomato and hearts of palm salad.  Stir fry with rice.  And then there are meals that we're obsessed with for a while but that somehow fall off our radar.  Beer and sausage pasta.  Tofu scramble.  We'll eat it once a week for a month and then not eat it again until, a year later, one of us says, "Hey.  Remember when we used to make [insert delicious dish here] all the time?"

Well, I'm hoping this new favorite doesn't disappear anytime soon because it is so delicious and different from our normal flavor palate that just knowing I'm going to have it for dinner can sustain me through a rough day.  I'm serious.

You can find the recipe over here at The Stay At Home Chef.  I've traded out the spinach for kale when that's what I had on hand, and it was just as delicious.  I leave out the chopped chipotle pepper and just use chipotle chili powder, and it's plenty spicy enough for me.  But if you can't find chipotle chili powder, I would definitely recommend using a chipotle pepper because that taste is delicious and way better than just regular chili powder.  And we use cheddar cheese rather than mozzarella because Cabot cheddar is all aged long enough to be lactose free (hurrah!).

(Word of caution:  Chipotle chili powder is spicier than chili powder.  If you add a bottle of it to your spice rack, don't accidentally interchange them in other dishes.  I say this from experience!)

What's your favorite meals these days?


Pistachio and Coconut Stuffed Dates


One of my favorite new food blogs is Cassie's Back to Her Roots.  Her focus is on healthy cooking and  living, but she doesn't go overboard with it.  As she says, "Now I understand that kale, birthday cake, rest days, flax seeds, strenuous hikes and good beer can all be healthy."  Cassie doesn't forgo all the pleasure of good food in favor of a smaller pant size.  Instead, she takes a holistic approach - good food (some hardcore healthy meals, some a little more decadent, but all made with good wholesome ingredients), lots of enjoyable physical activity, and a commitment to self care.

I swear, every time I read one of her posts, I feel better about life.

Besides that, she's just smart in the kitchen.  Her salads in a jar are genius, and her Sunday food prep regime has me spending a little extra time preparing on the weekends and being so glad for it during the busy week.

A couple weekends ago, I tried my hand at one of her recipes, and it was a huge success.

In preparation for a potluck, I made her stuffed dates and dipped one end in chocolate, a little added excitement that she mentioned in the brilliant post about how she preps food for the week.

They were a huge hit.  I had none to take home, and several people specifically sought me out to tell me how delicious they were.  Potluck score.

I followed Cassie's pistachio and coconut stuffed dates recipe completely.  And after they were all stuffed, I melted chocolate chips in a bowl in the microwave, dipped one end of the dates in and then let them cool on some parchment paper in the fridge.  (We use Sunspire grain-sweetened chocolate chips, which we buy in the bulk section of our local health food store.)


The bad news was that I discovered I'm allergic to pistachios.  Major fail.  I developed a cashew allergy as an adult that's gotten progressively worse in the last few years.  And now pistachios are also on the no-eat list.  What a shame.  I'd forgotten how delicious they are.

I'll have to come up with another version - maybe with pecans...


Thai Red Curry


I go through fits and spurts with cookbooks.  I tend to find most of my recipes from blogs, but every now and then I get a longing to lay a book out on the counter and splatter it with all sorts of ingredients.  There are two that I turn to most - my beloved King Arthur Whole Grain Baking and Moosewood Restaurant Cooking for Health.  They rarely disappoint.


I made this recipe for the first time last week, and I was completely wowed by it.  I wish you could smell through the computer because even before you taste this, the smell is divine.

The Most Valuable Player award goes 100% to the lime leaves.  Do not leave those out.  (I bought them in the produce area with the herbs.)  Just by floating in the coconut milk as it cooks, they give the dish that distinctive Thai flavor.  And I might have developed a habit of randomly pulling the bag of them out of the refrigerator, snicking my nose in, and inhaling deeply.  Might have.


Thai Red Curry
From Moosewood Restaurant Cooking for Health

8 ounces firm tofu, cut into cubes
2 tablespoons soy sauce
1 1/2 tablespoon grated, peeled ginger root
4 teaspoons coconut oil
3 garlic cloves, minced
1/4 cup minced shallots or onions
1 tablespoon red curry paste
1 14-ounce can coconut milk
1 cup water
2 Thai lime leaves
1 cup sliced carrots
3 cups bite-sized cauliflower florets
1 cup cut green beans (I used frozen)
1 red bell pepper, diced
1/2 cup chopped fresh basil
1 tablespoon lime juice
Grain of choice for serving (I used quinoa)

1.  Toss the tofu cubes, soy sauce, and 1/2 tablespoon of the grated ginger (I actually use minced ginger that I get in a har - it's one of my time-savers and means I'm not constantly throwing away dried up nubs of ginger that I forgot about).  Set aside for at least 15 minutes while you chop the vegetables.

2.  Prepare your grain of choice according to the package directions.

3.  Warm 2 teaspoons coconut oil in a soup pot on medium heat.  Drain the tofu and reserve the liquid.  Cook for 5-10 minutes, stirring occasionally, until the tofu is golden.


4.  After the tofu is golden, remove it from the soup pot and put it back in the bowl with the marinade.  To the soup pot, on medium-high heat, add the remaining 2 teaspoons of oil, the remaining tablespoon of ginger, the garlic, shallots or onions, and red curry paste.  Cook for about a minute, stirring constantly to prevent scorching.  Stir in the coconut milk, water, and lime leaves and bring to boil on high heat.

5.  Stir in the carrots and cauliflower, bring back to a boil, then reduce the heat and simmer for 5 minutes.  Add the green beans and simmer for 2 minutes.  Then add the bell peppers, basil, tofu cubes, and reserved marinade.  Return to a simmer for 2-3 minutes until all the vegetables are crisp-tender.  Finally, stir in the lime juice and serve with the quinoa (or other grain).


Five Ingredient Chocolate Nut Butter Cups (Sugar-free!)


The chocolate options for a person who's lactose intolerant and  doesn't eat sugar have exploded in the last few years.  At one of our local health food stores, we can buy peppermint patties and dark chocolate bars sweetened with honey, agave nectar, or coconut palm sugar.  We even recently found hot chocolate mix sweetened with coconut sugar.  And our favorite grain-sweetened chocolate chips are back in stock in the bulk section.

It's a far cry from the days when I used to sweeten my own chocolate and break it up into chunks so I could make chocolate chip cookies for my sweetie.  

But a girl who loves a cooking challenge can't stop when there are so many exciting ideas out there. When Angela from Oh She Glows posted this recipe for making your own vegan chocolate candies, I knew I had to try it.  Chocolate and maple syrup sounds just about as good as it gets.  

Well, until I decided to add in almond butter.

And jam.
 

Then...well, then I was in heaven. 


Five Ingredient Chocolate Nut Butter Cups
Adapted from Easy Homemade Vegan Chocolate

1 cup cacao butter chunks
1/2 cup cocoa powder
1/2 cup maple syrup, at room temperature
1/4 cup almond butter (or nut butter of your choice)
2 tablespoons jam (we used fig preserves sweetened with white grape juice)
(optional: a pinch of sea salt)

1.  Melt the cacao butter over low heat, stirring continuously.
2.  Once it is melted, stir in the cocoa powder and maple syrup.  Add in the sea salt if you're using it.
3.  Pour the melted chocolate into a blender and blend for a few seconds.  Be careful to allow the steam to release before blending so that your blender doesn't explode!
4.  Using 12 silicone mini muffin cups, pour a little layer of chocolate into the bottom of each cup. 
5.  Let the muffin cups sit for a few minutes in the refrigerator while you quickly mix together the nut butter and jam.
6.  Take the muffin cups back out, put a dollop of nut butter/jam mixture into each cup, and then pour the rest of the chocolate into each cup to cover the nut butter/jam mixture. 
7.  Freeze for about 30 minutes and then enjoy.


Store in the refrigerator, and try not to eat them all in one sitting.  :)


Simple tomato and hearts of palm salad


We went to a goodbye party for a friend last night.  Like many Burlington shindigs, it was a potluck.  I showed up with this salad, which made it one of three tomato-based salads on the table.  

Yes, it's tomato season here in Vermont.


And while we never got around to growing our own veggies this year, we're definitely benefitting from other people's abundance.  We have twice now been graced with overflowing baskets of beautifully colored tomatoes, and I am loving it. 

I'm happy to just cut them up and eat them with a little salt.  Or on a tomato sandwich (the only time you will see me slather mayonnaise onto a slice of bread).  But I really love them as the base for this salad.  


Simple tomato and hearts of palm salad

3-5 ripe tomatoes 
1/4 red onion
1 can hearts of palm, drained
2 tablespoons Newman's Own olive oil and vinegar salad dressing* (or oil and vinegar)
1 teaspoon dijon mustard
1 1/2 teaspoons honey
1/4 teaspoon salt
1/4 teaspoon freshly ground pepper

1.  Roughly chop tomatoes, onion, and hearts of palm and toss into a salad bowl.
2.  Whisk together the salad dressing, dijon mustard, honey, salt,  and pepper. 
3.  Pour the dressing over the salad and mix gently until all the vegetables are covered.
4.  Eat!


*I love oil and vinegar-based salad dressings, but I often struggle with getting just the right proportion of oil to vinegar.  While housesitting last month, I discovered this salad dressing in our friend's refrigerator.  I've been hooked ever since.  It has no sugar or other unnecessary ingredients, and it's a great base for my salad dressing concoctions. 


Katie


Interested in guest posting on ktmade? I'm especially looking for folks who would like to submit posts on creative topics, including food, craft, home decor, writing, and craft/life balance for the weeks of September 10-21. Email me at ktmadeblog [at] gmail [dot] com.

Beet Risotto

I love beets.  


And I love any opportunity to incorporate beets into my diet in interesting ways.  I'm even hoping to use some beets in a dye sometime - they're certainly an exquisite color.


This beet risotto gives me a little of both worlds.  


How often do you get to eat a savory fuchsia dish?!  Sometimes I try to avoid the beet color infusing my entire meal, but with this risotto, it's just plain fun!


And delicious to boot.


The sweetness of the beets combined with the creamy coconut milk and the nutty flavor of the brown rice makes for a complex dish that could work as a side or on its own.  


I had it as my entree for lunch today, but I've also served it alongside a salad and some grilled chicken.


Beet Brown Rice Risotto
Adapted from Group Recipes


1/4 cup Earth Balance (or butter)
6 small beets or 3 medium beets, peeled and chopped
1 medium chopped onion
1 cup short grain brown rice
1 cup vegetable broth
1/2 cup water
1 can coconut milk
1 tbsp balsamic vinegar
salt and pepper, to taste


1.  Melt earth balance in large pot over medium heat.
2.  Add onions and beets, salt and pepper to taste, and cook approximately 10 minutes until onion is soft.
3.  Mix in rice and all liquid ingredients and reduce the heat to medium low.  
4.  Simmer gently uncovered until beets and onions are soft and risotto is creamy, stirring occasionally. Probably about 20-30 minutes. 


Enjoy the colorful deliciousness!

Katie

Broccoli Arugula and Squash Soup


It's a little strange to be sharing a soup recipe in July, I suppose.  There are some of you will set this aside for the winter, but soup's an all-year-round dinner for me.  It's not what I reach for in the middle of the day when I'm sitting outside in the sun.  But at night, when I'm cozied in for the evening, soup is comforting - especially on those nights up here where things really cool down.  


I made this soup when I was doing a cleanse a couple years ago, and then I forgot about it.  I remembered it when I did the cleanse this time, and now, with a few modifications, it has become a staple of our diet.  


The coolest thing about it is that - for the most part - it's incredibly seasonal.  All the veggies in this pot came from the farm CSA that we got while we were housesitting.  


Broccoli Arugula and Squash Soup
Adapted from GOOP


One onion, chopped
One head broccoli, chopped
One zucchini, chopped
One summer squash, chopped
4 cups vegetable broth
One can coconut milk
Two cups arugula
Salt and pepper to taste


1.  In large pot over medium heat, saute onions in olive oil with salt and pepper for 3 - 5 minutes.
2.  Add in the broccoli, zucchini, and summer squash and saute, stirring frequently, for about 10 minutes. 
3.  Pour in the vegetable broth and bring to boiling.  Then reduce the heat to medium-low and simmer for 10-15 minutes.  
4.  Pour in the coconut milk and the arugula, adding more salt and pepper at this point if necessary.
5.  Using either an immersion blender or a traditional blender, blend the soup until smooth.  (If you're using a traditional blender, blend in small batches or allow the soup to cool before blending so that you don't blow the top off your blender.)
6.  Serve with a little dollop of coconut cream (or sour cream or yogurt if you can do dairy) and a slice of crusty bread. 


The blend of the broccoli and peppery arugula with the creamy coconut milk is absolutely delicious. And the zucchini and squash give it a little more substance.


I hope you enjoy!


Katie

Chunky CSA Spaghetti


We didn't get our acts together this year in time to sign up for a CSA (community supported agriculture).  We hoof it to the farmers market a lot, but I'm apt to buy less there than I would get in a weekly box from the farm.  The folks we're housesitting for belong to a CSA, and the abundance of veggies at our disposal is quite nice.  And we're under strict orders to eat them all so they don't go bad.


Yes ma'am!


A chunky veggie-ful spaghetti sounded like just the thing to me.  And it's quick, which is especially nice these days, especially now that our commute from work is a wee bit longer.


I love a good recipe that involves just throwing whatever you have into the mix (as shown here and here and here), and this one's no different.  I used the veggies I had - carrots, zucchini, yellow squash, broccoli, onions, and garlic scapes.  But you could use whatever you have around - cauliflower, kale, spinach, bok choy, mushrooms, green onions.  I wouldn't generally think of root vegetables (aside from carrots) in there, but let me know if you try that out!


The cool thing about CSAs (aside from the tons of delicious veggies at a lower cost than the farmers market) is that you get vegetables you might not buy on your own.  And then you figure out how to cook with them.  I only learned what a garlic scape was a couple years ago, but I always love when they show up.  They look a little like a more substantial, swirly green onion, and they taste like garlic.  They're more mild, though, so you wouldn't put them in at the beginning of a dish like you would with actual garlic because the flavor will just cook out.  I chop them up (down to the white part and then stop) and throw them in at the last minute - just so they can get a little soft.  They give a really nice fresh garlic flavor.


And who doesn't love that?


Chunky CSA Spaghetti

1 onion
1 zucchini
1 yellow squash
2 carrots
1/2 head broccoli
5-6 garlic scapes
1 12 oz jar strained tomatoes
1 package pasta (we used brown rice spaghetti)
2 teaspoons oregano
1 1/2 teaspoon basil
1 teaspoon rosemary
1 1/2 teaspoon salt
pepper, to taste
1 tablespoon olive oil

1.  Chop all the vegetables into whatever size suits your fancy.
2.  Saute the onions and carrots in olive oil over medium heat with salt until soft.
3.  Add in the zucchini, squash, broccoli and the rest of the seasoning.  Stir occasionally, making sure that the bottom doesn't burn.  
4.  Prepare the pasta according to package directions.
5.  Once all the vegetables have begun to soften, add in the garlic scapes and continue to saute for 3-5 minutes.
6.  Pour in the strained tomatoes and let simmer for 3-5 minutes.
7.  Mix with your pasta, and enjoy!


Katie

Green Tea Mango Smoothie


I've concocted a lot of different smoothie combinations over the last few weeks, and this one is the winner. No doubt about it. I've made it three times in the last week.


It's super easy to make, especially if you brew your tea the night before so that it has a chance to cool. Otherwise, you'll be like me - waiting anxiously while it sits in the freezer. If you wanted a frothier smoothie, you could also freeze the green tea in ice cube trays and have it on the ready whenever you want one. 


Because green tea does have a little caffeine (unless it's decaffeinated like mine is), this is a great smoothie for a summer morning if you're attempting to cut back on your coffee consumption.


And it gets bonus points for making you feel like you're on an island. 


Green Tea Mango Smoothie


1 cup brewed green tea, cold
1 1/2 cups diced mango (I like to do a mix of both fresh and frozen)
1 pitted medjool date (optional, for added sweetness)


Blend together, and you're done.


Enjoy!


I hope you're all looking forward to wonderful summer weekends! See you on Monday!


Katie 


PS - Remember how I'm speaking at the same conference as Katie Couric?  Well, I'm also speaking at the same conference as Martha Stewart. It's official, y'all - I'm famous. 

Artichoke and Asparagus Quinoa Risotto (GF, vegan, sugar-free)


Quinoa's on the menu at our place a lot these days. As a complete protein, it's an excellent way to get extra nutrients into a simple and delicious meal like a risotto. For a potluck we attended last night, I whipped this up so I'd be sure we had something healthy to put on our plates.


It was a hit with everyone - we didn't have a smidge to bring home!


It's a pretty easy but time-intensive dish, so you'll need to leave yourself at least an hour to prepare it when you can be close to the stove. 


If you've never cooked with quinoa before, give it a try. It packs more nutrients than rice - even brown rice - and the subtle nutty flavor is really excellent.


Artichoke and Asparagus Quinoa Risotto


1 can of artichokes in water
1 bunch of asparagus
1 cup of quinoa, dry
1 tablespoon coconut oil (or other oil)
1/2 teaspoon oregano
1/2 teaspoon thyme
1 cup vegetable broth
1 cup almond milk 
1/2 cup nutritional yeast
1/2 tablespoon white miso
1 tablespoon lemon juice
salt and pepper to taste 


1.  Chop and steam the asparagus until bright green and slightly tender.
2.  While the asparagus is steaming, add the quinoa, spices, and coconut oil to a pan over medium heat. Stir it all in the pot to ensure that the quinoa is coated, especially if the coconut oil is still hard.
3. Once the quinoa starts to sizzle and pop a bit, add in the broth, almond milk, nutritional yeast, miso, and salt and pepper.  Allow to come to a rolling boil, and then reduce to a sizzle and cover. Stir again ever 5-10 minutes. This is a good time to do some dishes or putter around the kitchen. Music helps. Resist the urge to leave or it might burn.
4. Once the quinoa starts to soak up a lot of the liquid and you notice there's not much left in the pan, do a quick taste test to see whether it's soft. If the quinoa seems too crunch, you might want to add a little more liquid. You can add in more broth or milk or a little water in 1/4 cup increments. You don't want it to be soupy or mushy - just creamy and soft. 
5. Once the quinoa is finished - all the liquid is incorporated and the quinoa itself is soft and perhaps slightly chewy (not crunch) - mix in the asparagus and the drained can of artichokes along with the lemon. Add a little more salt and pepper if necessary and serve. 


Enjoy!

Katie

{UPDATE:  Check out my friend Tori's comment below if you're interested in some non-vegan substitutions!}

Paging Jack Lalanne


I have tried to take an appetizing picture of the juice I've been making with my new juicer. 


It's not possible. 


I'll show you a picture of apples instead. 


They're in the juice. 


So I'm juicing. 


The impetus was a cleanse that I'm doing for the next three weeks. It's the most moderate one out there, and I could technically do the "liquid meal" portion with smoothies, like I normally make in the mornings. But I decided that I needed something to keep me excited about it while I'm doing without the things I crave (mainly sugar and cheesy things). And a fun new kitchen appliance does the trick. 


I bought a countertop version - the Waring Pro Juice Extractor - because many of them are huge and would've taken up all the available counter space in our kitchen. 


This one's not tiny, but it's manageable.


And it makes juice!


I know other folks have been doing it for years, but I'm still fascinated by the idea that you can shove a piece of kale down there, and JUICE comes out. From KALE. 


It's pretty awesome, and I've started out with the most basic green juice - a mix of kale, green apples, lemon, cucumber, and sometimes celery. Oh, and I've thrown some ginger in too. 


The flavor takes a little getting used to - it's not sweet but the green apples and the lemon help to make it not to bitter either. It's growing on me - it's refreshing, and I think once I start playing around with some other fruits and veggies in there - beets, carrots, parsley - I'll really start to enjoy it. Of course, yesterday I slipped up and accidentally called it grass juice instead of green juice. So maybe that's saying something?


Either way, the idea is to pump myself full of healthy fruits and veggies, and it certainly does that.


I may break the bank, though. The one glass of juice I made last night had 6 leaves of kale, 4 stalks of celery, 2 green apples, 1 cucumber, 1 lemon, and a bit of ginger! That's a lot of produce. 


Once I'm off the cleanse, I think juicing will become something I do occasionally - maybe once or twice a week - or else I'd have to get a second job just to keep paying for the vegetables. 


Of course, I'm eating a lot less of the other stuff - cheese and bread and donuts (I've developed an unfortunate Dunkin Donuts problem up here). So the cost might not be as much as I think it is in relation to what I would've been spending otherwise. 


Either way, I'm hoping to share a few juicing recipes here over the next three weeks, along with some new smoothie recipes, and maybe even a couple new healthy meals. 


Do you juice?

Katie

Simple Summer Slaw with Honey Vinaigrette


I'm a sucker for an easy summer salad. I hate to turn the oven or the stove on once it gets warm outside, and I'm not really in the mood to eat anything hot anyway. Instead I crave simple, refreshing foods. So salads that can function as a whole meal - especially at lunch time - are one of my main summer staples.


Salads based on cabbage can't be beat on that front because you can put basically anything in them, and they stay fresh much longer than your average garden salad, which can get all sad and wilted in the span of a day.


And, like the creamy quinoa salad I made a couple weeks ago, you can mix in just about anything you have in your fridge, and it'll be delicious. Some of my favorites that didn't make it into this version - hearts of palm, avocado, artichoke hearts, craisins, slivered almonds, cherry tomatoes, broccoli, and apples. There really are no rules for this salad.
I like to make mine with purple cabbage when I have it because it's just so pretty. With a few other colorful veggies thrown in, it's like I'm eating a work of art. In a really good way.

Simple Summer Slaw with Honey Vinaigrette

1/2 head of cabbage
Frozen edamame, thawed
1/2 yellow pepper
1/4 medium red onion
1/4 cup pumpkin seeds
1/4 cup raisins

Honey Vinaigrette
4 tablespoons olive oil
3 tablespoons honey
1 tablespoon balsamic vinegar
1 tablespoon dijon mustard
salt and pepper to taste

1.  Thinly slice the cabbage and chop up the rest of your veggies.
2.  Throw them all in a bowl together.
3.  Mix together all the ingredients for the honey vinaigrette and pour over the slaw.
4.  Thoroughly mix everything together.

That's it! So easy, eh?

And bonus - it's even better the second day.

Katie

Kale Puttanesca...sort of


I've gotten to the point where hardly a day goes by that I don't eat kale. Most often, it's in my morning smoothie, but I'm still a big fan of the leafy green on its own. After being introduced to raw kale in a salad, I throw it in mine whenever possible. And if I'm cooking, I would choose it over spinach every time. It holds together so much better, and I've never, ever had slimy kale. Unfortunately, I can't say the same for spinach. 


I got an email from my sister this morning with a recipe for a kale breakfast casserole, and I spent the rest of the day with kale on the mind. The breakfast casserole didn't work with the things we had around the house, but a kale-themed dish for dinner was a definite. 


I'm calling this a kale puttanesca because it has many of the signature ingredients of a traditional puttanesca - onions, capers, tomatoes, olives, served over pasta. But it's a bit of a misnomer since I left out the anchovies, threw in a few extra things, and made the dish a little less sauce-y. 


Perfect for a late May evening. 


My version of the kale puttanesca is gluten-free (we used brown rice pasta) and vegan. But you could use whatever pasta you like or add cheese. It would be delicious with grated parmesan sprinkled on top. 


Oh, and bonus points for being able to prepare the whole thing in the time it takes to boil the pasta. Perfecto.


Gluten-free, Vegan Kale Puttanesca


1 tablespoon oil (we used coconut)
1-2 cups kale, chopped
1-2 tomatoes, chopped
2 cloves garlic, minced
1 small onion, chopped
1 tablespoon capers
1/4 cup pitted kalamata olives, halved
1/2 cup white wine
1/4 teaspoon each dried oregano, basil, and thyme
salt and pepper, to taste
1 box penne pasta (we used brown rice)


1.  Prepare the pasta according to the package.
2.  Heat the oil over a medium flame.  Add onions and garlic and saute slowly, stirring occasionally. Add the oregano, basil, thyme, salt, and pepper. 
3. When the onions have turned clear, add the tomatoes and capers and continue to cook over medium heat, about 3-4 minutes. 
4. Add the chopped kale and the white wine. Cover and let simmer gently for about 5 minutes. While you're waiting, drain the pasta. 
5.  Mix the drained pasta and the kalamata olives into the saucepan with the kale, making sure the pasta is full incorporated with the "sauce."
6.  Enjoy!

Katie

Creamy Quinoa Salad


We've thrown open the windows to let in the warm air and the cool breezes. It feels good, like we're cleaning out the old - the solitude of winter - to make way for the new - communion with birds and flowers, neighbors and friends. 


It's not yet June, but it's summer. 


With the windows up in the living room, our front screened porch has extended our apartment, and we spend as much time in our plastic adirondack chairs as possible. 


I don't want to cook when I get home in the evenings. I want to whip up something refreshing and full of vegetables and eat it on the porch.  


This creamy quinoa salad packs all the nutrients you need into one bowl, and the dill dressing from Oh She Glows is my newest obsession. 


Dill tastes like summer, and I want to eat it on everything. Dishes have become vessels for dill.


This one is less of a recipe and more of an invitation to open the door of your refrigerator and start chopping whatever you find. You can't really go wrong with this salad. 


Creamy Quinoa Salad


2 cups uncooked quinoa
One batch dill dressing from Oh She Glows
Vegetables (I used tomatoes, a yellow pepper, sugar snap peas, edamame, and some arugula as a garnish)
Anything else your heart desires (chickpeas, artichokes, hearts of palm, raisins, almond slivers, sunflower seeds - seriously, go crazy)


1.  Cook quinoa according to package instructions.
2.  Put the cooked quinoa in the refrigerator for about 15 minutes while you chop up the vegetables.
3.  Add the chopped veggies (or other additions) to the quinoa. 
4.  Prepare the dill dressing and mix it thoroughly into the quinoa and vegetables.
5.  Serve! I topped mine with some arugula and feta cheese. Yum!

Katie 

Butternut Squash Polenta Casserole with Greens


Some recipes are worth the extra time and the number of dishes. You know the ones I'm talking about. 


The ones that have you in the kitchen two hours before you're going to serve them. The ones that leave you staring in dismay at a sink filled with pots and pans and spatulas. The ones that make your counter look like a small army of kindergartners were doing experimental finger painting with food. 


For a recent potluck with friends, I pulled out a favorite recipe from one of the Moosewood cookbooks and gave myself plenty of time and an empty sink. 


For me, casseroles are comfort food. I have so many wonderful memories from back as far as I can remember that are wrapped up in potlucks and casseroles and plates brimming with a little of this and a little of that. There's a coziness to sharing a meal that everyone in the room helped prepare. Of course, I think I felt that even before I was old enough to help in the kitchen. Perhaps potlucks are just cozy affairs no matter what.


Some casseroles are quick and easy - just throw all the ingredients into a dish, swish 'em around, and bake. 


You've probably gathered that this isn't one of them. With three layers that each need to be cooked and prepared separately, it's labor (and dish) intensive. But it's so delicious and hearty that I keep making it anyway. 


Butternut Squash Polenta Casserole with Greens
From Moosewood Restaurant Cooking for Health


Polenta Layer
2 1/3 cups water
2/3 cup whole grain cornmeal 
2 sun-dried tomatoes, chopped
1/4 teaspoon salt
1/4 teaspoon dried thyme
1/2 cup grated sharp cheddar cheese (we used soy cheese)


Greens Layer
2 tablespoons olive oil
3 garlic cloves, minced or pressed
8 cups stemmed and chopped collards (or kale or swiss chard)
1/4 cup water
1/4 teaspoon salt


Squash Layer
1 1/2 cups steamed and mashed butternut squash
1 large egg, beaten
1/4 teaspoon salt
1/8 teaspoon ground black pepper
2/3 cup grated sharp cheddar cheese (we used daiya cheese)


1. Preheat the oven to 350 degrees. 


2. Polenta layer:  Bring the water to a boil and quickly whisk in the cornmeal. Add the sun-dried tomatoes, salt, and thyme and cook on low heat, stirring often, until the polenta is thick and creamy (about 10 minutes). Stir in the cheese. Pour into a lightly oiled 8 or 9-inch square baking pan and set aside. 


3. Greens layer: Warm the oil in a pan over medium heat. Add the garlic and cook briefly, stirring constantly. Add the greens, water, and salt. Cover and cook, stirring occasionally, until the greens are tender and bright green (about 5-7 minutes). Drain and spread the greens over the polenta.


4. Squash layer: Chop and steam the squash until tender and then mash in a large bowl (canned would work as well). Stir in the egg, salt, pepper, and half of the cheese. Spread the squash mixture over the greens and then sprinkle the rest of the cheese on top.


5. Bake covered for 35 minutes. Uncover and bake for 10-15 minutes. Let sit for 5-10 minutes before serving. 


Enjoy!

Katie 

Green Smoothie Goodness

What makes a new house or apartment feel like home? Obviously getting all your stuff unpacked and settled is a big one, but that can take weeks (especially if, like with us, unpacking requires purchasing new furniture pieces).  Until then, I find the this-is-my-home feeling in the kitchen.  Making a nice big pot of soup or chili is a great start, but it really hits me when I'm making the usual things, like breakfast.  The routine of bopping around the kitchen, opening this drawer and that to prepare something I've made a million times before.  Then I'm home.  This morning, it was getting back to my breakfast smoothie.

Green Smoothie 1
For the last few months before I left DC, I was having this green smoothie for breakfast every morning and loving it.  My mom thought I was crazy for drinking a smoothie with spinach and kale in it until I made her test it, and she was forced to agree that it's freaking delicious.  Not only that, it keeps me satisfied until lunch, and according to my calculations, it's only about 375 calories!  Disclosure:  I'm not generally a calorie counter and please don't expect to see calorie information on other recipes - in fact, it's a trigger for my previously eating-disordered self.  But as a newbie to the smoothie world, I was curious about whether this "healthy" breakfast was actually healthy in terms of sugar and calorie content, so I did a quick check.  Turns out it is!  And I'm eating five servings of fruits and vegetables before 9 am.  Holla.

If you're cringing a bit about the thought of drinking kale and spinach for breakfast (or at all), I encourage you to give this recipe a try.  I promise you won't taste it.  

Though I'm sure it would be terrific to have a fancy blender for this smoothie, I make mine with my trusty immersion blender because (1) I don't have a fancy blender, (2) the not-fancy blender I own might have been in an accident involving pureeing hot soup resulting in the top blowing off and shattering, and (3) the immersion blender is crazy easy to clean.  

See my fancy set-up:
Green Smoothie 3
Immersion blender + plastic pitcher = blending goodness.

If you're using an immersion blender, you might want to check it before you stop blending to make sure there aren't kale stragglers - they sometimes get stuck in the little holes of mine.  I just pull them off and give it one more whir.
Green Smoothie 2
I know that I found the basic recipe (with a few minor changes from me) on Pinterest, but I just have it in my head now and can't for the life of me find it again.  If anybody knows where this comes from, please please let me know so I can give credit.  Thanks!
Green Smoothie 4
Green Smoothie

1 cup orange juice
1 cup kale
1 cup spinach
1 banana (folks usually use frozen, but I like it better not frozen)
1 pear
1/4 tsp ginger 

Blend and enjoy!

Two caveats to this recipe:  

First, you'll notice there's no protein in here like in some other smoothie recipes, like almond milk or yogurt or peanut butter.  I'm not a huge protein person in the morning.  It sits too heavy in my stomach.  But I know there are those who need that.  Navah has hers with a scrambled egg.  And I sub in avocado for the banana to up the protein element.  You could also add in a powdered protein or sub almond milk or yogurt for half of the orange juice.  That's the fun of smoothies - play around!  I sub in different fruits all the time.

Second, if you're new to 100% fruit/veggie smoothies, I recommend that you take it slowly.  Start with just half this recipe for a week and work your way up.  It can be...hmm...shall we say, a lot for a stomach that's not used to it.  

'Til next time!
Katie 


Vegan Tofu Scramble: Copycat Recipe

Tofu Scramble 2

One of my favorite brunch places in DC is Open City in Woodley Park, primarily because they have a super interesting and varied menu, and they give you coffee in a cup only slightly smaller than your head. One of my favorite items there is the vegan tofu scramble.  It has such a fresh and unique flavor that I used to order it even before I knew I was somewhat allergic to eggs.


When I was there a couple of weekends ago - for what I knew would be the last time before I leave for Vermont (which, thankfully has many great brunch spots), I ordered the vegan tofu scramble, noted the ingredients in the menu listing, and studied the flavors while I ate so that I could attempt to recreate it at home.
Downloads
Before I share the results, I must admit that I am not one of those people who tastes a spoonful of something and instantly knows it needs more paprika or cumin or dill or anything really except salt.  I'm also not one of those people who can eat something and say, "yes, that thing you're tasting is cardamom."  Just not one of my skills.  So if the folks at Open City hadn't been so kind as to put the main ingredients on the menu, and if the dish weren't fairly straightforward, I probably never would've been able to make it.


With that being said, this was one of the best meals I've ever made.  The taste is complex and refreshing, and it's super simple to make - the best combination ever.


It was simply a matter of slightly browning the chickpeas,
Tofu Scramble 8
steaming the broccoli, and throwing that and the tofu in the pan
Tofu Scramble 3
while making the sauce.
Tofu Scramble 10
Tofu Scramble 6


The MVP Award goes to:
Tofu Scramble 7
Well played.  Seriously well played.


So, without further ado, here's the recipe:

Tofu Scramble 5

Vegan Tofu Scramble
Adapted from Open City's menu item


2 T tahini
Juice of 1 lemon
2 T water
2 T olive oil
1 tsp dried chives (I subbed these because I didn't have scallions)
1/2 block extra firm tofu
1 can chickpeas
1/2 small head of broccoli


1.  Rinse the chickpeas and pour into a pan with about 1/2 T olive oil over medium heat.  Add a little salt and pepper to taste.  You'll stir these occasionally while you prepare the rest of the ingredients.
2.  Take your tofu out and place it between two paper towels on a plate, and place a heavy object, such as a cast iron pan on top of it to squeeze out the water.  Let it rest like that until you're ready to cut it up.
3.  Steam the broccoli just until bright green - I used a traditional steamer in a pot, but a microwave steamer would work just as well.
4.  Prepare the sauce by combining the tahini, lemon, water, olive oil, and chives in a small bowl.  Set aside
5.  At this point, your chickpeas should be nice and golden, and your broccoli should be bright green. Cut up your tofu into small cubes and throw it and the broccoli in with the chickpeas.  Let that cook for about 2 minutes.
6.  At the last minute, just before serving, pour in the sauce and stir around until everything is coated.  You don't want it to be in there for more than a minute or so - just enough to heat the sauce.
7.  Serve!  I paired mine with mixed greens and a vinaigrette, but it would be great with toast and fruit or hash browns as well.


Enjoy!
Tofu Scramble 4

Katie 

Roasted Tomato and Red Pepper Soup


Roasted Tomato and Red Pepper Soup 5
A couple nights ago, I walked into my apartment and headed straight for the kitchen to prep the white bean and pumpkin chili that I'd been planning to make.  It's one of my absolute favorite meals but one that takes a bit of prep time and a fairly long ingredient list.  I had taken some roasted pumpkin out of the freezer a few days before, but I just hadn't gotten to it yet.  Since I didn't have quite enough pumpkin, I was planning to supplement with a can of butternut squash I had in the cabinet.

As I started to take out the ingredients, I realized that the can of butternut squash was actually a can of sweet potato puree.  And then that I only had one can of white beans (I still think someone came in and stole the others - I just KNOW I had more than that).  And then I pulled out the pumpkin from the fridge, and .... yep, moldy.

So....no pumpkin and white bean chili.  But what seemed to be a tragedy of epic proportion (I really wanted that chili) turned out to be a great opportunity.

Roasted Tomato and Red Pepper Soup 1
I'd already pulled out the tomatoes and the red peppers, and they were staring up at me from the cutting board.  The skin on the red peppers was starting to wrinkle ever so slightly, so I knew they wouldn't be around for long.  I did some quick thinking about what I could make with what was sitting in front of me (not generally my forte), and since I had my heart set on something soupy, I threw this together:

Roasted Tomato and Red Pepper Soup

3 tomatoes (I had beefsteaks, but I think 6-8 romas would be delicious)
2 red peppers
2 tsp minced garlic (or 2 cloves)
2 tsp kosher salt
1 tsp cracked pepper
2 tablespoons olive oil
2 small or 1 large onions
2 cups vegetable stock

1.  Preheat the oven to 450 degrees.
2.  Cut up your tomatoes and red peppers.  There's no science to this - do what works.  I quartered the tomatoes and cut the red peppers in half, removing the seeds and stems.
3.  Place them on a rimmed baking pan.  Sprinkle on the garlic, salt, and pepper.  Pour on the olive oil.  Make sure everything's coated.  It should be a slippery affair.
4.  Let roast for 30 minutes, checking occasionally. 
5.  While the tomatoes and red peppers are roasting, cut up an onion and saute over medium heat in the bottom of a soup pot with a little bit of olive oil, salt, and pepper.  Once the onion's looking soft and clear (about 5 minutes), pour in the vegetable stock and let that simmer on low.
6.  When the vegies come out of the oven, pour your tomatoes into the soup pot, but keep out the red peppers.  You'll want to let those cool a bit so that you can peel off the skins.  They'll come right off.
7.  Once the skins are peeled, throw in the red pepper.
8.  Using either an immersion blender (what I use) or a regular blender, blend it all together.  If you're using a regular blender, be careful to do small batches so that you don't blow the lid off your blender (which I have done).

Roasted Tomato and Red Pepper Soup 2
The soup did not disappoint.  With a surprisingly rich and creamy flavor, it's like an adult version of your regular ol' tomato soup.  I paired mine with some pita bread, but I think a grilled cheese sandwich would be the perfect complement.  You could even serve this for company if you made "fancy" grilled cheese with gruyere or gouda or some other fancy g-named cheese.  Ooh, now I'm hungry.

I imagine making a huge batch and freezing portions to take out on particularly snowy mornings so that it'll be ready for a quick simmer on the stove when we get home. 
Roasted Tomato and Red Pepper Soup 6
What do you make to keep you toasty warm on those cold days?

Katie

Strangers + Granola = Happy

Granola 2

I'm not even sure how the conversation got started, but last Friday morning, I found myself laughing about cooking woes with another woman in line getting coffee.  I told her about the batch of granola I had burned the night before because I didn't realize how much hotter this oven is than my old oven.  She was amazed that anyone even made their own granola, and after I assured her that it was just about the easiest thing to make (as long as you don't get into a long phone conversation with your mom and forget to check on it), she asked for the recipe.  We exchanged emails, and I sent it to her when I got to my desk.  She emailed back that she was looking forward to making it and would let me know how it goes.

Oats 1

Connecting with strangers is, for me, one of the simplest and most delightful pleasures of life. Sharing a laugh or a smile with someone I've never met breaks through - if only a little bit - the barriers that we put up around ourselves every day.  Here in the city, especially with Navah gone, I feel pretty walled off.  I take the bus to work, sit in my office, take the bus home, play with Jammer.  I talk to people at work about work stuff, I talk to my friends and family on the phone, and I usually hang out with friends on the weekends.  But I realize that my in-person interactions are exceedingly rare these days.  And interactions that involve laughter and lightness are even more rare.  The result is that a conversation like the one I had with that woman last week can brighten my whole day.

Granola 1


I don't know if she'll make the granola, but I thought about her as I made mine, making sure not to let it burn this time.

Easy Peasy Granola
From the Vermont Ladies

3 1/2 cups oats
1/2 cup each:
  pecans
  wheat germ
  toasted shaved coconut (I toasted mine in a pan on the stove)
  slivered almonds (I was out of these, so I used walnuts)
  pumpkin seeds
  sunflower seeds
1 tsp vanilla
1/4 tsp salt
1/4 cup oil (I used olive oil - I bet it'd be delicious with coconut oil)
1/2 cup maple syrup

Preheat the oven to 250 degrees.  Mix everything together on a baking pan, and bake for 2-3 hours, stirring every hour or so and checking on it every half hour.  Let it cool and then store in an air-tight container. 

Granola 5

If you want to add in dried fruit, like raisins or craisins, do that after you bake it so they don't get dried out.

Funny story:  This is a half-recipe of what I normally make, but I forgot in the middle that I was splitting it, and I poured in the full amount of maple syrup and oil.  It looked like a lot, and I realized - woops! - too much maple syrup!  But then I thought, Hey, what the heck.  :)  So this batch is extra decadent.

 Granola 6

Enjoy!

Katie

PS - This is a great holiday gift!!